Do your knees turn in, or twist in, or do your legs whip around when you run like an eggbeater on land? Do you look like you are an equestrian and you don’t ever ride horses?
I call this syndrome horseback rider-itis.
What? *gasp* What is that?
I love tacking -itis onto words to make them sound like an official diagnosis. In this case, the muscles on the insides of the thighs are really strong and tight, and it looks as though you have been riding a horse even when you haven’t.
Never fear, there is a solution!

Grab a stretchy band, scarf, jump rope, or shoelace. It doesn’t need to be fancy, just something long enough to be able to tug on.
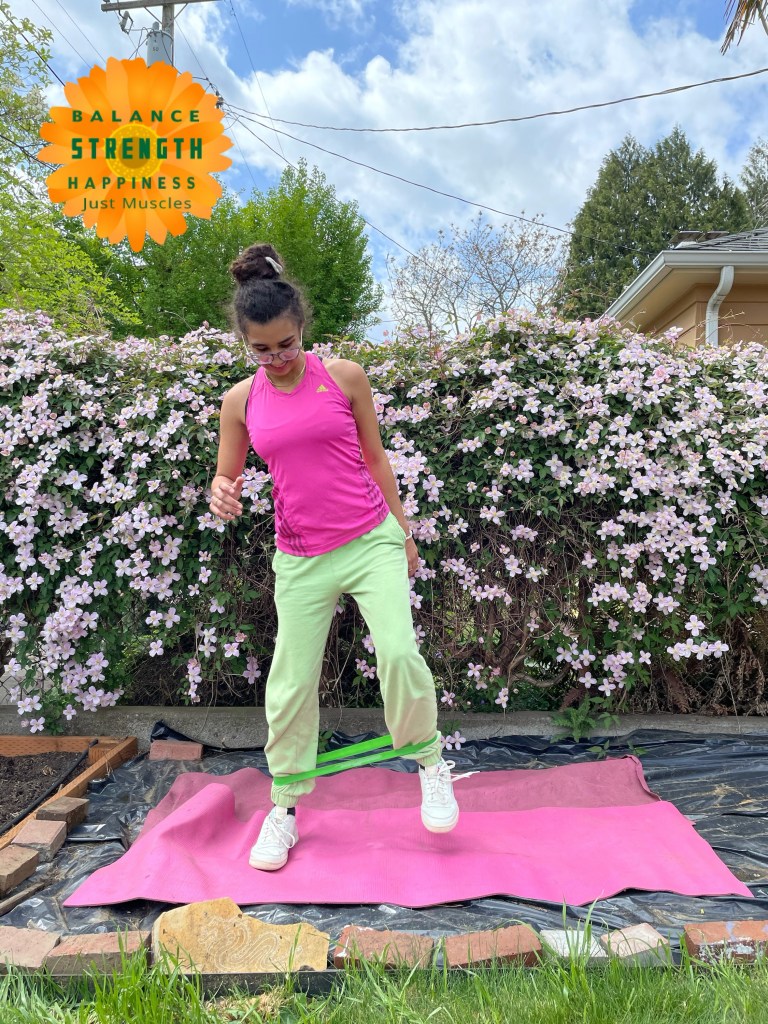
Before I learned this technique, I used to band clients up with the band and pull the knee out like the photo above to help them feel the lined up position of the leg.
That got them a certain amount of results, but then I learned about this other idea.
In this case, you notice the direction the knee is going, and with your band PULL THAT KNEE IN EVEN MORE.
So you see a mistake, you make the mistake BIGGER.

In this case, band up the knee, and pull the knee in EVEN FARTHER.
Now you, the person with the funky knee, have to do one of two things:
1. Collapse
2. Use the muscles of the hip to push that knee out so that it is straight again.
My preference is the second option, so pull that knee out using the hip muscles (and can you guess which one is in charge of external rotation? OH YES YOU CAN…Our friend the glute!!)
Now the knee will track correctly, you the athlete will be tapping into a muscle to hold the knee in the correct direction (rather than an external force like a band doing the work for you) and ….
All will be well in the land. 🙂
Watch the quick video below to see me in action using this super easy and fast corrective tool that you can do to yourself- no trainer needed!
Let me know in the comments below if you or someone you know has horseback rider-itis and if this was helpful! Come on over to Instagram and tell me what you think there, too…. @laura.coleman27
Have a mini stretchy band lying around? Need a really quick strength workout using it? Read on! Do all exercises for 90 seconds, and then move on. Total workout time: 7.5 minutes….. GO!
First we have speed skaters…jumping side to side with your mini band around your ankles. Drive through your heels, and see if you can get your glutes to work equally as you move.
Here is the seated row with the band around your feet. Pull back using your lower shoulder blades and keep the upper shoulder area relaxed if possible.

Full sit up with the mini band around your knees. Press out on the band, start with your arms over your head, and come all the way up. Your abdominals will do the first 30 degrees, and then your hip flexors finish it up.

Bicep curls with squats. Press out with your wrists on the mini band, and bring your hands up towards your shoulders as you drop down into a squat.

Now split your feet into a nice, big lunge. Put the band on one wrist, take that wrist behind you, and then slide the other hand in. Extend the arms behind you and feel the backs of the upper arms while you hold that lunge. Switch feet halfway if you’d like to make sure both hips get some lunge love!

Here is the action video if you’d like to watch my friend Jayda demonstrate each exercise with some coaching.
Have fun, Happy Earth Day, and get moving! No excuses!!
Your hip flexor is a major muscle that you need on your brain’s available muscle radar…but that begs the question of how do you know exactly where it is? How do you get it to work? It is brought onto the brain’s radar by crawling as a baby, but if you need to tap into it as an adult, how do you go about doing that?
Let’s figure that out!

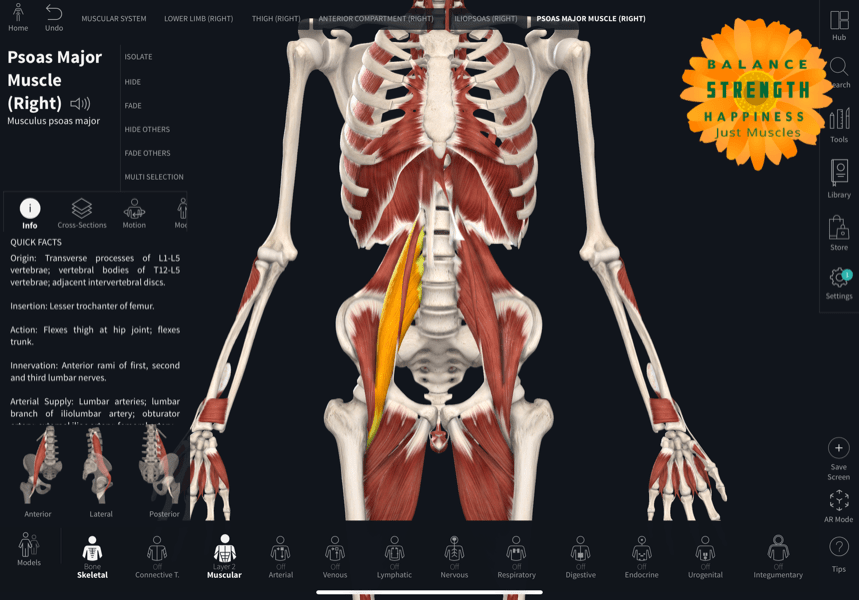
So, notice that one half of the hip flexor muscle lines the inside of the hip, and attaches to the top of the inside of the thigh bone or femur. This is the iliacus- anything “ilium” sounding refers to the hip.
It has a slightly more famous best friend that you might have heard of- the psoas. Pronounced “SO-AZ” ….sound familiar?
Here’s what those two muscles do- they lift the leg up to take a step, or jump over a hurdle for instance.

Is there anything else that reminds you of the photo above?
How about a person sitting down…
That would also cause those two muscles to shorten, simply by the position you find yourself in on those endless Zoom meetings.
Here’s the kicker: YOUR BRAIN DOES NOT KNOW THE DIFFERENCE
The brain doesn’t care if you are sitting or repeatedly jumping over a hurdle. It just knows the muscle is shortened, and will therefore knock out the iliopsoas’ antagonist muscle the glute as a result….
A gentle reminder to mix it up during the day if you’re working with home. (Not from home: with! With home! Heard that distinction on a TED talk recently!)
I digress! 🙂
So now, how to find that hip flexor and tell it apart from the quad.

The photo above shows you where the hip flexor muscle is exposed. Notice it is just a fraction of the actual muscle- you really don’t have much access! Further, it is immediately adjacent to the quad attachment point which I show below…They are next door neighbors and are SO easy to mix up!

So how do you tell them apart? Well, lie on your back with your right leg extended out and put your right hand on that thigh or quad muscle. Contract that right quad and trace the muscle up to it’s attachment point on the hip. You’ll feel the tendon move under your fingers. Now, move your fingers over a smidge, and you are in hip flexor territory! The hip flexor actually lines up with the nipple, if you need another landmark to help you locate it.
A simple exercise to then engage the muscle is to let your knee fall in slightly (to disengage the inside of the thigh muscles) and lift that totally relaxed leg off of the floor maybe 12 inches. You are trying to get your HIP to pick your leg up off the ground, rather than your leg picking your leg up. Foot floppy so no shin helps, and try it for 90 seconds.
Of course try it on the other side!
I have made a video below to clarify the written directions, and let me know in the comments below if that makes things easier to locate and isolate that fabulous hip flexor!
P.S. I have been talking about this extensively on Instagram, so follow me there: @laura.coleman27
Ever throw your back into a spasm by taking part in the Olympic sport of lifting dishes out of the dishwasher? How about that time when you tried to lean over to pick up a leaf off the ground and next thing you know you’re on the ground next to it, writhing in pain?
There is an easier way to help avoid these back spasms!
Please, please employ a technique using your hips called the “hip hinge”.
What is a “hip hinge”, you ask?
Why, it’s simple!
There are two ways to bend over to reach something on the ground or floor in front of you.
You can bend over using your back, like I demonstrate below, without any regard for your hips:

OR, you can hinge at your hips. I like to start that motion by jamming my fingers into the fronts of my hips, right in the area where my hip flexors are located.

Use your hips as a hinge…use the hips as your fulcrum for the movement…bend at the hip first…. however you like to think about it. Then, when you reach for the gnome on the ground, it’s all about your hips rather than your back!

This also looks like another favorite move of mine…the squat!
Seriously, it is that easy.
Lean forward using your hips rather than your back and then I won’t get SOS texts saying, “help! I am in a back spasm!” 🙂
Here is another video explaining the technique in more detail if you’d like. You might be thinking, “My back is fine! This doesn’t apply to me!” However, I suggest you watch and tuck the information in your back pocket just in case you need to reference it in the future.
An once of prevention is worth a pound of cure, dontcha know!
Let me know in the comments below if you’ve thrown your back out and how you helped it. I’m also on Instagram these days so be sure to follow me there for more tips and tricks… @laura.coleman27

The other day I was delighted to hear from my dear friend Gwen. She and I worked at Club Med together, and had later worked out in San Diego together at the very beginning of my career. We have stayed in touch mostly via Christmas cards, but the other day she reached out for some help with an ankle that just wouldn’t seem to heal from an injury in October. About two weeks later, she texted me this message:
“Hey, can you get nerve pain from your hip down to the quads. Mine are quite sore now for last 2 days.”
Apparently the ankles were better, but now another problem had revealed itself.
Awesome!
I love when layers of compensatory mechanisms peel away, revealing some root causes.
I wrote her back and said, “Sure you can. That’s the opposite of the sciatic nerve…it goes down the quads. Ever had it before? Some people get it from tight jean-itis…their jeans are tight and it compresses the nerve as it travels over the hip bone.”
Tight jean-itis is a made up word, of course, but very descriptive! I love tacking “-itis“ onto things that drive me bananas to make them sound more diagnostic and official. “Itis” just means “inflammation of”, so in this case we have an inflammation of tight jeans.
Tight quads also drive me bananas, so I often refer to the malady of “tight quad-itis” too. 🙂
We can take a three pronged approach:
So how do we go about solving tight jean-itis?
ONE: Nerve pain can come from the actual vertebrae and disc area. The nerve root- the part of the nerve that comes immediately out of the spinal cord- might be getting compressed. Nerve pain feels hot, or burning, or shooting, or pins-and-needles, or numb. Nerve pain tends to get your attention very quickly, and cause a bit of panic. This requires further investigation, and perhaps some official diagnostic information like an X-ray or MRI, but this investigation ties directly into the other two prongs.

TWO: The nerve is actually getting compressed where it crosses the hip bone. This is a simple solution: give yourself a little more fabric to work with!
THREE: One hip is out of position and putting pressure on the opposite side. Everyone has a strong or dominant side, and the other side is not as strong. Often the strong side, because it is doing the lion’s share of the work, appears to be the “problem” side. Believe me when I say the pursuit of balancing out the less strong side is time well spent. How do we catch the less dominant side up? Try skipping the strong side entirely when doing a strength exercise. Try giving the less dominant, less balanced, less flexible, or less coordinated side a second round of repetitions to match the natural ability of the dominant side.
Regardless of wether your strong side is displaying the symptoms, or the other side seems to be the problem, you want to balance the two sides out.
An incorrect assumption would be that both sides are working equally.
I find that is almost never true.

Never!
Therefore, deploy the three pronged approach, and see if you have within the locus of your control the ability to dictate to your body how it is to feel.
The opposite is often true: you feel as though you are at the whims and mercy of your body.
No longer!
Let me know in the comments below if you have investigated this paradigm. It will add longevity and balance for all of your days!
It’s time to quit relying on willpower, because that can be fleeting. It’s time to quit forcing yourself into discipline or motivation. It also wanes. I just read a blog by another trainer in Australia who completely “fell off the wagon” even with the deepest of convictions. Trainers should know better!?!
Change is really hard. How then to accomplish it?
How about being able to do something without thinking!
I just listened to the most interesting TED talk by a woman named Christine Carter. She is a sociologist, and her job is coaching people on effective science-based habit formation. She decided that she wanted to get back into running, and spent a week devising a very elaborate plan, and set her goal at a half marathon.
She lasted a few weeks, and then gave up entirely.
“A spectacular failure” in her own words. Funnily enough, this is her job. She coaches people on habit formation.

Why did she fail, when she of all people should know better?
In other words: What makes things easy to do, or not so easy to do?
Her strategy to avoid this epic failure and resulting feelings of despair, rather than going for the gusto and have an equally epic failure, is this:
1. “The only requirement is: that you stop trying to be so good.”
2. “You’ll need to abandon your grand plans, at least temporarily, and consider doing something so minuscule that it would be better than not doing anything at all.”
3. “It depends on our willingness to be bad at our desired behavior….be willing to be bad!” Also please watch out for the word “SHOULD”. If you catch yourself using that word then in comes the internal negotiations, willpower, and need for motivation again. Careful!
4. “Ask yourself: how can you strip that thing that you have been meaning to do into something so easy you could do it every day with barely a thought?”
5. “This minimal effort always turns out to be way better than doing nothing at all….so for now, what could you do that is so ridiculously easy that you can do even when nothing is going as planned?”
Remember her half marathon goal? She decided to get back into outdoor running by getting up in the morning, brushing her teeth, and then stepping out the door to run for… get this….

EXACTLY ONE MINUTE.
One minute. That was it.
Does that seem do-able?
The “why” of this is the super interesting part to me.
She explains, “Once we hard wire a habit into our brains, we can do it without thinking, and therefore without needing much willpower or effort. A better-than-nothing habit turns out to be incredibly easy to repeat again and again until its on autopilot. This is because we can do it even if we aren’t motivated, even if we’re tired, even if we have no time whatsoever. And once we start acting on autopilot, that’s the golden moment that out habit can begin to expand organically.”
So, if you’d like to create a new habit, be willing to be bad at it. Be willing to make it so incredibly easy that you almost can’t do the new thing that you want to incorporate into your life. Water it down. Make it easy. Your goal is to go for eventual autopilot!
Here is the link to the full TED talk… it is only 11 minutes long and definitely worth the listen! Let me know in the comments below what your 1 minute strategy is going to be!
In the spirit of Play Tennis Day on Feb 23rd, we are using tennis balls to get after trigger points. What exactly are trigger points? Do you ever find spots that when released seem to get the entire muscle to settle down? That is what we are talking about here. Some people complain of “crunchy” muscles and getting those “crunchy” spots to break apart is another way of describing trigger points. They can be in the muscle, the fascia, or both. Since they are “points”, not whole muscles, it works best if you have a smaller thing- in this case the tennis balls- to loosen them up.
Notice that the goal is to get your hips higher than your shoulders in order to put downward pressure on the upper back. Have you noticed that if you lie flat, you can’t get the downward pressure on the upper back in particular? This is why you want something to wedge under your hips. Try a yoga block, use your roller, a firm pillow, or a roll of paper towels. Additionally, you don’t have to get on the floor or on your yoga mat; try the couch or a bed instead. Try holding for 90 seconds to release and start to reset the targeted area.
So you will need tennis balls (if you don’t have any you can get some here) and if you feel so good once we finish releasing the trigger points you are ready to get out and play some tennis, here is a well researched resource for the other key part of the game: the racquet.
Meet my sweet client Sara. She personally tested these trigger point release positions and liked how they felt. She is a great sport about doing whatever crazy thing I throw her way…so off we go:
Trigger point spot #1: neck and upper back
Place the two tennis balls just to the side of your neck just below the top of your shoulder. Put the block under your hips. Dig around to find the tight spots. When your breath catches in a really tight spot, remember to exhale! Hang out there for 90 seconds and try to breathe into the spot- visualize it melting like butter. Ghee. Vegan cheese. One of those things. 🙂

As you settle into this upper shoulder/neck release, see about changing your arm position and extend your arm to the side like Sara is here.
Trigger point spot #2: shoulder blades and mid thoracic spine
Now you are going to take the tennis balls and place them in the space in between your spine and shoulder blade. Hips again on the block. Sara lifted her arm overhead here just to demo the ball placement.

Again, start with your arm at your side and then extend your arm out to the side.
Trigger point spot #3:
If you know your anatomy, you are targeting T12, or the 12th thoracic vertebrae. This is just below the bottom edge of the ribcage. Place the tennis balls there, hips on the block or pillow, and bring your bent knees toward your chest. Breathe. 
Once you have the basic position accomplished, try taking your bent knees and rolling them to the side like Sara is doing here. Take another deep diaphragmatic breath!
Trigger point spot #4:
The meaty hip muscles– the three layers of glutes!
Roll on your side and slide the tennis ball into the meaty part of the hip. Sara demos the start position here.
Your next step is to gently roll your hip back onto the ball. Look at Sara’s face. Enough said. 🙂

How does that feel, now that you are done? I drive my car with two tennis balls in a sock in my mid-back almost all of the time, so I’m used to digging into my muscles this way. How about you?
Ever wondered what the famous beach volleyball women’s team of Misty May-Treanor and Kerri Walsh Jennings were wearing on their shoulders in the Olympics? Yep, it was kinesiotape.

Growing up, I had athletic tape to use on my ankles. This, if you haven’t had the chance to use it, is a totally different animal. For instance, you can wear it for 3-5 days. You can wear it into the shower. You can sleep with it on. It is used to enhance a muscle in a vigorous workout, or quiet down a muscle. It stretches two ways, and can be used preventatively as well as for rehabilitation.

The versatility of the tape and ease of application is one of it’s best qualities.
I had the unfortunate circumstance of catching an edge snowboarding recently, and went to my dear friend and massage therapist Kim Dewey in Lake Oswego, Oregon, for help. I asked her to share some of her tips on using the tape as it has far-reaching applications. Her biggest tip, which she repeats frequently in the tutorial is, “stretch the client, not the tape!”
What does she mean by that? Well, I suggest you watch her in action explain how to use it and pitfalls to avoid.
Let me know in the comments below if you’ve had a chance to use this tape and for what purpose!

I love being in the mountains, and so I decided to take off the other day, just relax in the woods, and discuss recovery.
In this case, I have been getting a bunch of questions on how to fuel a workout, and this is my favorite quick combo. Let’s say you’ve just finished work for the day, you’re not ready for dinner, but you’re feeling low energy…what can you do to give yourself a boost that won’t upset your stomach?
Or, let’s say you’ve headed out on a super day-long hike, and want some extra energy packed into your water bottle….any suggestions?
What about if you are done with your workout for the day, you know you need to refuel, but you just aren’t hungry for a couple hours. Ideally you have a 45 minute window to pack the most energy back into those cells….What can you do in this instance?
Easy!
Two ingredients: I use Nuun (a low sugar electrolyte tablet) and glutamine (which is an amino acid). Both are easily found and totally legal! (You’ll understand that comment when you watch the video 🙂
10 grams of glutamine replicates 60 grams of consumed carbohydrates…so easily accessed energy for workouts, but you don’t have to actually eat the carbs which might upset your stomach.
Glutamine does not have any flavor, and the addition of the Nuun (or Gatorade/Powerade/etc) gives the drink a little flavor as well as electrolytes. In the Nuun case, it has very low sugar while the -ades have lots of sugar. I shoot for low sugar; both do the job.
I have used this combo before soccer games, during the Tough Mudder race, and my husband takes it in his water bottle for every tennis match he plays.
Watch the video below for a little demo on mixing them together and a story about a big bike race!
Let me know in the comments below (or on my Instagram laura.coleman27 ) if you like it or other fueling combinations you prefer! Super interested to hear about it!

So you have heel pain. So does my track teammate Angela on the right side. I filmed her running, unbeknownst to her, and froze the video to get this screen shot. That right heel and ankle is definitely torquing in, so that doesn’t help matters at all.
But is it the whole problem?
Take a look at the screen shot of the left side.

Hay Caramba! When caught fully loaded on the left hand side, you can see her left hip pop up (compare it to the position of the right hip above) and her left shoulder dramatically drop down. The right hip might have some lateral shift, but the right shoulder stays level. Therefore, the right hip is more stable and in a better position than the left hip.
Way more stable.
So why the pain on the right side?
The left hip, of course!
It is up and wiggling around, and putting more pressure on the right side. If you build a house with the third story slightly higher on the left side, where will all the furniture slide? To the right side, thanks to gravity! The right side is paying the price for the out-of-position and perhaps ‘on vacation’ left side.
We have a group text for the track team, and all we kept hearing about was how she couldn’t run because of the darn heel. She was consulting with a physical therapist, and nothing seemed to change. She brought up the fact that maybe she needed a stronger core. She even mentioned some glute work she was doing. She is also a doctor, so unquestionably she was getting high quality care.
But nothing seemed to change.

We just kept hearing about that darn heel. See what I texted her? “Get your left hip flexor!”
Finally, two weeks ago, she and I ran a mile together and I tried explaining AGAIN what I thought the problem was. After the workout, she asked how to get her left hip flexor working, so we tried a couple exercises.
What happened next? Watch the quick one minute video below to find out!
The moral of the story? Take a look at the whole system that is your body, not just the part that hurts! You want to get after the cause, not merely the symptom. Let me know in the comments below what you think! Did you see the problem here in this case study? Have you tackled something similar?
Follow me


Copyright 2022
JustMuscles.net