


The first thing to know is that the inner thigh muscles are called adductors. What, might you ask, is an adductor? Well, as you know, I love to show you the anatomy, so let’s take a look at the five muscles involved in the hip. They are primarily located on the inside of the thigh, and their job is to pull the leg toward the centerline of the body, and stabilize the leg while you move forward as well.
Meet your adductor muscles
They have fun names: this is Gracilis

This is Adductor magnus

And our friend Adductor longus

His buddy the Pectineus

And tiny helper Adductor brevis

Spot the adductors
Watch this video of Miss Mary running and see if you can see the adductors at work.
Here are two freeze frame snapshots from the video of her running. See those adductors at work? Those muscles are grabbing her upper thigh and twisting the knee in.


Fast forward to last weekend, where she was playing in a soccer tournament, and hurt her knee. She came to workout talking about her knee, and how it hurt, but there wasn’t anything that really happened… no big tackles, no big kicks, no big falls. Just hurt out of nowhere, it seemed.
Or did it?
There is a big push out there for girl soccer players in particular to do some ACL (anterior cruciate ligament inside the knee joint itself) prevention work. Women have slightly wider hips than men, and the measurement from the front of the hip bone to the knee is called the “Q angle”. Q angles are bigger on women because structurally we have wider hips for babies. In my opinion, this increased Q angle also contributes to knees on women having a greater tendency to roll in, like you saw in the video and the stills above.
Recall that the knee joint is a hinge joint like a door, not a revolving door that rotates in a circle. Yet when knees roll in, that is exactly what is happening. The most dangerous situation for a knee is when you are on one foot and twisting. That is when knees are most vulnerable and get taken out, or in some cases, you blow your ACL.
If you start with a knee that is already rolling in or “knocking”, like Mary’s above, then in my opinion it is just a matter of time. Add some impact with kicking and tackling and changing directions quickly, and it won’t take much to irritate the knee. Sometimes stepping off a curb becomes an Olympic event. 🙁
What is the happy news?
Well, I’m so glad you asked. Guess what I am going to say. I know I am a broken record, but as it turns out the best thing to balance the adductors is to get the glutes to work. They are antagonists. Yes, as I said in the email intro we scrubbed the adductors to release the tightness, but you need some muscles to engage to keep the release released. Add some hamstrings in. Get that knee tracking straight ahead again!
If you want help remembering how to acitvate glutes, re-read this BLOG; if you want help with hamstrings, re-read this BLOG!
As my eleven year old Mary left our workout, her knee didn’t hurt anymore because we got the glutes and hamstrings working again.
I yelled to her across the park, “Hey, Mary! Do you have a knee problem?”
She yelled back (I kid you not), “No, Laura, I have a glute and hamstring problem! Share on X”
AAAAH. Happiness. Smart girl! 🙂
Let us know in the comments below if you have had these twisty knee problems and what you’ve done about them. I’m super curious to hear about it!
How cute is this?
This “Fit Spot” at our local park is designed for the 55+ crowd, and yet here we find littles hopping on the two person outdoor elliptical machine.

Take a look at the circuit laid out at the park.

Pretty easy to follow along, since the directions are posted on the side of the machine.

Let’s take a look at this machine in particular- the chest press.

See how on the left there is a seat and on the right there is empty space? These are ADA compliant, meaning you could roll up in your wheelchair and still be able to use it. Notice the handicapped symbol on the sign to indicate this feature.
Quick tip number one: Don't sit down! Share on X
Utilize the “handicapped” side of the machine, the part with no seat. What do I mean by that? Well, let me use my client Julie to illustrate three ways to use the machine best. We have a similar system at Club Sport Oregon.
Here we have Julie showing how most people do a chest press on a machine- by leaning against the back rest and sitting down.

Here we show Julie in a lunge position doing the same chest press. Look at how much more of her body is involved in the lift: lower body is stabilizing the upper body.

Wait. Isn’t that how real life goes?
Normal machines with all of their precision engineering take away from precious work, stability, and strength the body provides while executing a lift. Why would you take that away?
Here we have Julie using the “handicapped” portion of the machine. It is wide open space, and much easier to get into a lunge position without a) punching the machine or b) maneuvering around the seat.

The other nuance with chest press in particular is the option to completely decelerate the movement into your shoulder blades.
Decelerate the movement? What?
You’ve heard the term “range of motion”, right? Well, in this case, exaggerate how far back your elbows go and squeeeeeeze your shoulder blades together. That makes the chest muscle, your intended target, as long as you can possibly get it, and you can punch those fists together in a forward motion to maximally contract it.
How does this apply to the whole circuit?
Well, most machines that have the handicapped spaces actually allow your body to be more involved in the motion. Lots of machines have sitting down and standing up options; try doing a squat or a lunge or just stand there rather than sit. If you do five or six machines where the focus is on the upper body, but you are doing squats and lunges along the way, you really won’t need to do much in the way of a “lower body” workout. Additionally, really focus on using those shoulder blades when you are doing an upper body lift. I see them getting short changed all the time.
Talk about maximizing your workout time!
Let us know in the comments below if you have tried a standing option while lifting weights (look on the suggested poses posted on most machines!) and how you liked it!
How do you fix those twinges or outright spasms of the hip flexor? Remember when I blogged about functional versus positional hip flexor tightness? Well, in a nutshell, the twinges my client Carley was having while she was running in her hip flexors was functional tightness. Those muscles are working in her preferred movement pattern, and now they are getting too tight and causing pain. I also have a really good story about a client of mine who looked like Santa and was once in a bilateral (both sides) hip flexor spasm, but I’ll get to that in a minute.
Hip Flexor Tightness
Wondering where legitimate hip flexor tightness might be on a body? Look at the photo below.

The green arrow is where you would feel the hip flexor tightness, kind of in the front of the crease of the hip where the pleats on your pants would be. (Am I dating myself? Do people wear pleats on pants? 🙂
The blue arrow is actually where A LOT of clients tell me they have hip flexor tightness, but that is actually quad ( a secondary hip flexor or the body’s second choice muscle to pick the leg off the ground) tightness.
Not the same.
The best stretch
What then do we do? I suggested an exercise called Supine Groin. It takes a bit of time as we are primarily relying on gravity to work its magic with the floor as a frame of reference. Let’s get into the position, and talk about what’s going on.
Here is one way to do it with one chair as your primary “equipment”:

You’re going to lie on the floor with one leg in a neutral 90 degree angle in the seat of the chair, and the other leg straight on the floor, in this case wedged inside the chair legs. This allows you to relax the outside ankle up against the legs of the chair, so your foot can be straight up and down, but relaxed. This is key, as most feet want to roll out and stay there when relaxed. Make sure that foot is straight, and the leg in line with the hip.
Great! The hard part is done.
Now we need to check in with how tight that hip flexor is, exactly. I’m often asked: “How much time do I spend in this position?” There are two ways of figuring that out. You obviously can’t contract it lying down in the position you are in, so how do you know? First, contract the quad (front of the leg) without help from other muscles and hold. Where is the concentration of the contraction of the quad? Is it down by the knee, about halfway up the leg, all the way up the leg and near the hip, or there isn’t one spot you can nail down.
Take note.
Additionally, the other thing to correlate the quad contraction with is space in the low back. Is there any? Can you slide your hand under your back easily? Again, take note. The goal is to have no space in the low back, and not one spot in particular you can feel in your leg. This position takes advantage of gravity working its magic not only on the hip flexor, but the whole low back/pelvic/hip region as well as the knee! Stay there. It might take 30 minutes, or an hour. If you can’t stay that long, chip away at it. Your quad will tell you when to trade sides.
Here’s another way to do it, with an ottoman style bench. In this case, a handy kettlebell (or books, or small speaker, or heavy basket) props up the outside of the foot so it can be relaxed and yet perfectly upright.

Take a look at how much space he has between the floor and his knee. OOOsh. He’s had several surgeries on each knee, and we are trying to passively and gently reposition the knee taking into consideration the back and the hip.

My Santa story
Want to hear the Santa story now that you are all snuggled in? This is a great time to turn on a movie, or in Bill’s case, he watches basketball while doing what he calls his “knee stretch”. Remember my reference to Santa above? This is my favorite Supine Groin story to tell while my clients are waiting for gravity to work it’s magic.
Once upon a time, I had a client who wanted to climb Mt. Everest. He trained, and trained, and trained (not with me) and flew off to Nepal, where he happily eventually arrived at his dream destination: Base Camp at 20,000 feet. Suddenly, fate struck a cruel blow, and he without warning all of a sudden went into a bilateral hip flexor spasm. Hard. Fast.
Boom!
Do you know what you look like when you are standing, and then go into a hip flexor spasm? You are bent forward- close to a 45 degree angle- from the hips. STUCK THERE HE WAS! Did I mention he looked like Santa? Long flowy white beard, and snowy white wavy hair. That wasn’t the only problem that hit that day. Recall that the hip flexor attaches to the T12-L4 vertebrae (12th Thoracic just below the ribs, and almost all the way to the tailbone). Let’s add bilateral sciatic pain down the backs of his legs to his feet to this misery, shall we? Screaming, burning, lightening bolts of nerve pain down the backs of both legs.
Horrible!

Image of Mt Everest courtesy Huffington Post
Unfortunately, the camp doctor didn’t know what to do with him, so he sent him on a pack animal ( I think a Yak?) down the mountain to the nearest village. Imagine how much fun that ride must have been. 🙁 Super unfortunately, the village doctor didn’t know what to do with him either, other than put him on a direct opiate derivative. He said at that point it didn’t cut the pain, but he didn’t care. Super duper unfortunately, just when you think this can’t get any worse, our Santa starts to hallucinate because this drug is so powerful.
Oooooh no.
Imagine this: a tall American who looks like Santa bent forward at a crazy angle hallucinating in a village in Nepal. What’s the most logical thing to do at this point? Oh, I know. Let’s send him to a psychiatric ward in India!
What????
At this point in the story, his wife finally tracks him down, flies to India, rescues him, and takes him back to Los Angeles where she has to immediately admit him to a rehab facility thanks to the direct opiate derivative. Lest we forget, no one has done anything about those hip flexors! Finally, he makes his way to the Egoscue clinic where I worked, and he and I spend the next six months on the floor doing Supine Groin.
How does this story end?
A year later, he came back for a follow up visit. He was doing great, and mentioned that he jokingly told his wife that now that he was feeling good, he was thinking about returning to Everest. “Do that, and I’ll divorce you!” was her reply. 🙂
The moral of the story: let your hip flexors relax. Do your Supine Groin. Your marriage is worth it!
🙂
Let us know in the comments below if you’ve had troubles with hip flexors and what you’ve done about it!

Curvature of the spine
What is scoliosis? Well, dictionary.com defines it as a noun, Pathology 1) an abnormal lateral curvature of the spine.
Meet my client Vic. He is a super sweet upper 70’s guy. In this picture he is holding a April Fool’s joke I played on him– he opened a foil covered metal tin with a brown E in it. Get it? Not a pan of brownies. A brown E!
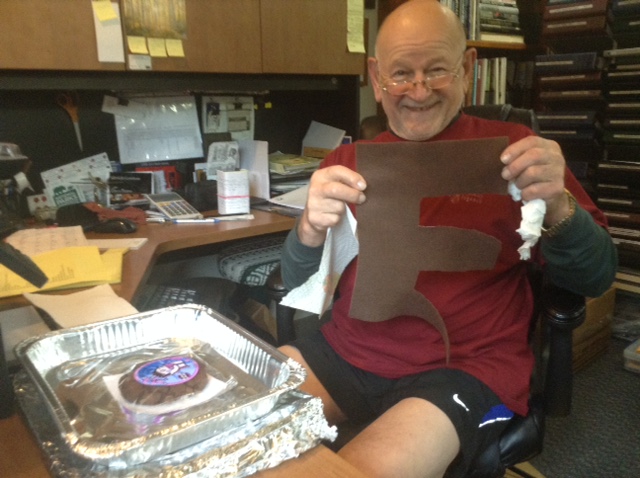
ha ha ha. 🙂
This is what scoliosis looks like
Anyway, take a look at his X-ray from two years ago. This is what scoliosis looks like.

The red line up the spine on the left X-ray shows you the scoliosis. Definitely shifted laterally so we know dictionary.com isn’t kidding. More importantly: the blue horizontal line shows you what position his hips are in. Are they level? Um, that is a big fat NO! Look at that left hip. Jacked up higher than the right.
This is a very key element.
I personally think the scoliosis stems from that left hip. If it was in the same horizontal plane with the right hip, the spine would have a level platform to work off of. It makes sense that the spine shifts laterally to accommodate the left hip. Multiply this by fifty, sixty, or seventy years and you’ve gotten yourself in quite a situation.
Or have you?
Interesting what the spine looks like from the side as well as seen in the X-ray on the right: the green arrow shows one vertebrae really slipped back and the blue arrow points to completely compromised disc space. Those bottom lumbar vertebrae are totally ka-squished together. The natural “S” shape of the spine has turned into a “J” of sorts.
Nerves and vertebrae aren’t fond of being squished.
Guess which side the nerve pain went down? Right or left? (The answer will be revealed below.)
Scoliosis and nerve pain
When I met Vic, he had already had two back surgeries. They were not successful in that he still had nerve pain down his leg. Ugh. 🙁 He and I were able to get him off narcotics after six months and feel good for half a day, but by late afternoon that nerve pain was back with a vengeance. I’ll get to how we did that in a moment.
Long story short, he decided to really stabilize those lumbar vertebrae that were squished and now structurally weakened by two surgeries. He decided to get one more surgery: Fusion.
Not just any ‘ole fusion, but a four-level fusion. He doesn’t mess around. (Actually he didn’t have a choice.) I said, even though I was sad we hadn’t been able to avoid surgery, “Now that you’ve decided on surgery, we are going to focus on it’s success and fantastic results, and our goal is to get your body in the best possible position going into surgery that we can. That way your rehab will be a breeze and you’ll enjoy the fruits of your labor and pain-free life that much more quickly.”
“Okay,” he said.
Here’s what his low back looked like post-op at six weeks:


When I first looked at the X-rays, I said, “Holey Moley! I think I’ve used screws like that to put my deck together. Orthopedic surgeons are such highly trained carpenters!” We laughed. However, what I was really looking for in those post-op X-rays was one thing. Can you guess what I was looking for?
That’s right. The left hip.
Why?
It’s all about that hip
I have seen X-rays of fusions with rods and screws that didn’t look so lovely. I can remember one in particular where we measured the rod on the left to be 2″ and the bar on the right to be 2.5″. It had EVERYTHING to do with the hip position. Over my dead body was Vic’s fusion going to be anything other than ordinary, level, and as symmetrical as we could possibly get it.
We succeeded.
How did we do it?
Well, quite honestly, we crawled. Turns out Vic never crawled as a baby, never developed those critical hip muscles, and was using his back and his legs without the gigantic powerhouse connecting piece: the hips.
Crawling put his hips back into a nearly symmetrical, level position. It is an incredibly powerful exercise. When we went for the twelve week post op appointment this week, I asked if we were clear to do anything exercise-wise now. The surgeon looked at me and said, “Well sure, except the usual no bending, twisting, or lifting.” I said, “Can we crawl?” He was taken aback for a moment, laughed, and said, “Well, I’m not doing that! However, many of my fusion patients crawl around their garden so they don’t have to bend over when they want to do gardening, which as you know is against the rules.”
There you have it, ladies and gentlemen. A crawling endorsement!
Learn to crawl
Remember the quote from my client Sandy in the email? Where she had gained back lost height? She and I started working together in late April to address her scoliosis, and here it is July and she is getting taller. Why? How?
Crawling.
Our fabulous nutrition expert Margaret Floyd Barry just blogged about her “broken knee” experience recently. You’ll read about what her experience was with crawling, too.
All the kids are doing it!
Want to see a quick video on how to crawl in case you’ve forgotten? Watch this!
Ever thought about using crawling as a great way to work or reset your entire body? Let us know in the comments below!
P.S. The nerve pain went down the right leg.
Did you guess correctly? If the left hip is higher, it sometimes is just simple gravity that more work and workload end up on the downhill hip. In this case, the right side.
(Or how to fix neck, upper back, and shoulder tightness)
I was just going through the blogs and I can’t believe I haven’t yet written about the foam roller. Lying longways on the foam roller, that is.
I was introduced to the foam roller about 10 years ago in a gigantic hotel ballroom with about 250 other personal trainers doing a workshop.
Instructors threw out a one foot long 6 inch in diameter round little piece of white styrofoam to every participant. I looked at it and thought, “How could this little thing do anything impactful?”
Ha!
How wrong I was.
The next instructions were to flip over on your stomach and place the roller under the quad muscle on the front of the thigh. Nothing happened until I followed the final instruction, which was to actually roll up and down the thigh.
Aaaaaah! What the heck!?!
Imagine being in a room with 250 people whose faces instantly go into all sorts of contorted expressions as they realize the crazy tightness that has been discovered so quickly in their leg as they roll. This little piece of styrofoam totally kicked their booty. It still makes me giggle to think about. 🙂
I blogged about this last week when I talked about knees and knee pain. That is one way to use the roller, but this is quite another.
You are in for a treat!
Here’s the nitty gritty:
Hop on the three foot long roller on your back with your stomach facing the sky longways. Even if you do nothing else while on the roll, this will reap tremendous benefits. Turn your palms up to the sky, too. That allows that whole shoulder girdle to open up and roll back.

I’ve run into clients who find this basic position uncomfortable. “The roll is too hard,” they tell me. No problemo: take a towel, fold it in half, and put it on the roller before you lie down. Additionally, I’ve also run into pointy heads and protruding tailbones. No problemo: take a hand towel and make a little donut out of it, put it on the towel on the roll, and then climb on.
Anything else? Oh ya!
Let’s say you’ve had breast cancer surgery. Your shoulders are rolled forward in protective mode, or just so darn tight from being a desk jockey, that this is not comfortable and pulls too much. No problemo! Just place a pillow, books, or in my case below, a yoga block under the elbow to decrease the pressure.

Truly, just lying there with your palms up is a great start. However, I take advantage of the awesome opportunity to get to know your shoulder blades a little better. The roll allows you to actually feel them move around versus something less kinesthetic like just lying on the floor.
Shoulder Anatomy
Let’s look at shoulder blade anatomy here for a second. Here we have the headache muscle in yellow, trapezius number one. Classically overused and chronically tight on most people.

It’s best friend is trapezius number two, seen below. Remember the way the lines are drawn are the direction the muscle fibers run.

Here’s my favorite trapezius three and four, and our target today ( and always) on the roller. You want to figure out how to squeeze that lower trap and get it to work to take pressure off of the upper guys.

Peel away a layer of trapezius muscles, and you can see how many little muscles are available in the shoulder blade area. Seventeen in fact act on the shoulder joint! We will also target the rhomboid to help bring those shoulder blades back towards the spine where they belong.

When shoulders round forward, shoulder blades come with them, and then the chest or pectoralis muscle on the front of body gets tight and shorter, while all of these trapezius muscles get slightly longer and tighter. There is very little balance between front and back, and everybody gets frustrated. As a result, over time you might get a migraine, or TMJ, or sinus problems, or a sore neck, or impinged shoulder. You might even tear your rotator cuff, develop tennis elbow, or carpal tunnel.
Yuck! Yuck! Yuck! 🙁
4 Exercises for your shoulders
Try these four simple exercises as a starter to get those shoulder blade muscles working and in balance. I like doing most exercises for about 1:30 each time, and remember the second set always goes better as you’ve re-established a nerve pathway. This is as much a brain workout as a muscle workout! I like to alternate hip exercises with shoulder blade exercises as I’ve never gotten blades to cooperate without a good solid hip foundation.
Exercise #1: Shoulder Bridges

Drive through your heels, exhale through your nose to stabilize core, and use glutes and hamstrings equally to lift hips off roll. Careful back and quads don’t try to dominate.
Exercise #2: Reverse Presses

Bend elbows to ninety degrees, and push elbows into floor feeling lower part of shoulder blade slide in towards roller as a result of you simply pressing on elbows. I know you can squeeze your shoulder blades together; I am interested in the trigger mechanism neurologically from elbow to shoulder blade. Do not let chest help or tighten up!
Exercise #3: One Foot Shoulder Bridge

Cross foot on knee, and now drive through heel lifting both hips feeling glute work really well with hamstring helping. If one side is stronger than the other, feel free to do a few more repetitions to catch the weaker side up.
Exercise #4: Open the Newspaper


Now tuck your elbows into your sides bent to ninety degrees, and open imaginary newspaper across chest feeling shoulder blades slide into roller using trap 3/4. Careful of your neck!
Now for the best part of the day:
Roll off the roller and lie on the floor. How long have you been there? Gravity has sneakily been working, wrapping both spine muscles around the roller and relaxing them. Does it feel like the roller is still there or little elves have come along and dug a tunnel while you were working out?
That is my favorite part: The tunnel!
Give these exercises a try and let us know in the comments below how they worked or if you have any questions!
I can’t tell you how many times I’ve been told that someone’s KNEE is messed up. Hundreds of times.
Is it really your KNEE?
Or could it be some muscles either above or below the knee that are causing misery and suffering for the joint?
8 times out of 10 I get almost instant relief by having the person either roll or scrub the quad. Quads are notoriously tight on nearly everyone, so I’m not kidding, if your knee is sore will you please just roll or scrub the quad?!
It is that easy.
That easy to eliminate the majority of the unhappy knees syndrome, which happens so frequently I have decided it deserves its own name:
Tight quaditis.
Aaah. Now you can announce to friends, family, and innocent bystanders that you are suffering from an -itis! That makes it sound official, elicits sympathy, and adds a bit of mystery to the situation.
Please, just roll it out, or scrub it out, moving from side to side. Why won’t you?
This is my favorite response: “… it HURTS!”
What is below the skin?
I have been innundated lately with inside of the knee complaints, so let’s take a look at the inside of the knee anatomy and see exactly what might be a culprit. Look at the photo below:

There are actually three muscles that attach here, and I have color coded them so you can see where they are on the leg. The first one is the orange guy, the sartorius. This guy crosses the front of the quad amd attaches to the hip.

The second one in yellow is the gracilis which is an inside of the thigh muscle, or adductor.

The third and final guy in pink is actually a hamstring muscle, the semitendinosus. It is supposed to be one of three hamstrings to keep the quad balanced out, and from my last blog on hamstrings we know that that the inside and middle hamstrings seem to be classically overused.

So which of the three is causing the most problem? Hard to say. Let’s go after all of them! First on our list: scrub, scrub, scrub.
Remember how to scrub?
Go across the joint and try to release the tendon and fascia for 15 seconds. Don’t go much longer than that as you might irritate things joint-wise.
However, your knee joint only really feels the pressure of the tendons because the tendons have super tight muscle fibers tugging on them. Remember, muscles only have so many (as in limited) muscle fibers, and if they get tight, and you insist on moving, your muscle finds a way, and inevitably starts to tug on the place it attaches.
Wanna stop the tug? Wanna make the joint feel better?
Release the tightness in the muscle.
Then the tendon will stop tugging on the place it attaches- the joint, and the joint will stop hurting. (This is really a three point argument, because to then get a released muscle to stay released, you have to the ENGAGE another balancing muscle group to keep it relaxed….so quads balancing muscle is hamstrings, which I wrote about last time; and inside of thigh is balanced by outside of hip or glute which I talk about incessantly. I digress. 🙂
So in the case of the inside of the knee, I gave you the photos of the muscles on purpose. Trace where the fibers go, and get after them! Don’t focus on the white stuff for more than 15 seconds– roll or scrub the muscles themselves, and see if you get any “snappers” (where the muscle is so tight it feels as though it is snapping under the roller) to Leggo my Eggo.
Good luck and let us know how releasing the tightness in the muscles AROUND the knee goes in the comments below!
Think you’ve got allergies?
Listen to this story.
Once upon a time, I was working in San Diego for my old boss Pete Egoscue. He introduced me to my client David (not his real name). He had some very minor back pain, but unlike most of the clients I saw daily, that was not the real reason he was at T.H.E. Clinic. Pete said, “David is allergic to the world, ” and walked away.
I turned to David quizzically, and he smiled. “Let me explain,” he said.
Turned out that David was from back East and worked for his family insurance business. He started sneezing and reacting to allergens early on in his career, primarily at work. He began investigating various medicines to combat what he figured was allergies. Nothing helped. He tried acupuncture, homeopathic remedies, and even had fillings removed wondering if it was mercury poisoning. The gamut of Western and Eastern medicine.
Still no change.
Something in the air
Things got worse at work. Bloodshot eyes, headaches, nonstop runny nose. It was interfering with his ability to complete his work. However, oddly enough, no one else in the family seemed to be affected.
Desperate, he did a little background investigation on the building the insurance offices were housed in. Wouldn’t you know it? The building used to be a mortuary! Oh my goodness, it was formaldehyde fumes permeating the air.
Of course!
That was the problem, and the solution seemed simple. His family, a bit weary of the complaints, happily agreed to let him work from home.
Which seemed practical, except when he opened the boxes from work, the fumes overcame him and he still couldn’t get anything done.
His family was now loudly grumbling about the “quackery”. At one point they thought he needed to be committed to a mental institution.
(How do I know that? His brother called me during his stay in San Diego and asked me if I thought he was insane.)
Seriously.
“It is getting so bad,” he said, ” that when I try and go out to play golf, if the wind shifts and the fumes from the freeway blow in my direction, I start reacting and have to leave the course.”
I had never heard of such a thing.
He continued with, “By the way, if you plan on working with me, I would request absolutely no lotion and I might have to special request what shampoo, laundry detergent, and deodorant you use, or to keep a certain distance from me to avoid a reaction. Don’t be offended if I put on my kn95 mask.”
Wow. Now here was an interesting client!
What was the solution?
Move to improve allergy symptoms
Move.
His muscles were massively imbalanced, and his metabolism was super low, and there wasn’t the alternate contraction and relaxation of the muscles to pump up his immune system.
And it got worse, and worse, and worse… And really worse.
Until he found himself face -to -face with moi. 🙂
The best sinus relief exercise ever!
Here’s one of the exercises we did together, with my client Aida modeling the exercise.

See this calf stretch board?

Most people use it like this- Holding onto the wall for dear life.

Try spinning the board around so the high part is facing out. Now climb on and put your head, hips, and heels against the wall. A thick book does the trick in a pinch.
You want equal pressure on both heels, and you will feel a BIG stretch in your calves. Try contracting your glutes and see if you actually take pressure off of your calves and get the hamstrings to connect to the glutes.
Stay there for ten minutes if you want your sinuses to release. Essential to keep your head on the wall, too.

What?!? Let’s talk about whats going on.
Sinuses, pictured here, drain down little tubes in the back of the throat.

If your head comes even ten degrees forward ( think like a protractor!), similar to my client Amanda’s head here:

Then those tubes insidiously build up, and build up, and then one day *POW* you have a sinus infection.
Let’s eliminate the head-forward position by giving you a beautiful vertical frame of reference- the wall. Walls are very straight up and down, and that’s what we want you to be!
Welcome to straight up and down!
Let us know in the comments below if you have any other exercises for battling sinus problems. Perfecto!
P.S. I am sure you will be happy to know that David fully conquered his allergy to the world.
In his last appointment with me, I said, “See! I’m a foot from your face and I wore lotion today! So there!” 🙂
Hamstrings. The bane of some, the pride of others. Let’s take a look at the anatomy first. Here is an overview of the back of your body:

You can see the glutes across the back of the hip, and then just below them are the hamstrings. There are only three, and they are obviously on the back half of the leg. By comparison, the antagonistic quads are on the front of the leg, there are four of them, and generally speaking most people walk forwards on a regular basis. 🙂
That puts hamstrings at an instant disadvantage, because they are in a numbers down situation ( 4 quads vs. 3 hammies) and most people don’t walk backwards. (If they did, I think hamstrings would be happier overall! )
Here is the hamstring closest to the inside of the leg. It’s name is the Semitendinousus. I find most of my clients have this hammy functioning well.

Semitendinousus Hamstring
Here is the hamstring in the middle. Name: Semimembranosus. Again, most of my clients have no problems with getting the middle hamstring working.

Semimembranosus Hamstring
Finally, here is the outside hamstring — the big chunka-monka — Biceps Femoris. Look how big that turkey is! It takes up half the back of the leg! Guess what- I find that 8.5 times out of 10 this third giant hamstring is completely asleep on at least one leg for every client I see. Another case of muscle amnesia.

Biceps Femoris Hamstring
However, consider now the ratio of quads to hamstrings. On a good day, quads outnumber hammys 4:3. Given my empirical evidence, quads now outnumber hammys 4:2 . That gives quads the outright ability to truly overpower those poor hamstrings, and there are many consequences to the hamstrings directly.
Namely: the hamstrings that are working pull easily or cramp easily. Really easily. Poor little things! Two against four, and on the back of the body!
Could this be you?
Let me tell you a story. I had a 16 year old competitive dancer client on a high school dance team in the middle of competition season. Aaaah!!!!! She “pulls” her hamstring in the middle of a competition. Her parents rush her to the doctor, who prescribes normal rest (not active rest!) for six weeks. We all know how I feel about normal rest. Not generally useful.
I digress. 🙂
She is chomping at the bit to get back. Her team is headed to state and she doesn’t want to miss it! Who can blame her? However, she follows the doctor’s advice to the letter, and heads back to practice after her six week moratorium has passed.
What do you think happened? Was she all better? Did rest do the trick?
Nope.
“Pulled” the exact same hamstring first day back. 🙁
( Why do I keep putting the word “pulled” in quotations?)
This is when I enter the story. Her godfather, my client, called me and I went over to puzzle through this very time-sensitive dilemma. She got all of my favorite muscles to work on her, but then when she stood up to walk around her hammy felt the same. I said, “Maybe it’s tight and needs a gentle stretch?”, so I stretched the not-sore side, and then we did the sore side.
She screamed as she grabbed the back of her leg, “That’s exactly how it felt when I hurt it!”
I looked at her, taken aback, and slowly puzzled through what had just transpired. Here is the conclusion I arrived at: What if she was only using ONE or TWO hamstrings, and they felt “pulled” as they were the sole workers carrying the entire load? What if we tried a hamstring curl instead?
AWOL Hamstrings
*Gasp. A STRENGTH move for a “pulled” muscle? Huh?
She flipped on her stomach, and we tried a traditional hamstring curl to make sure all three hammys were on board. First, of course, on the unaffected side, and then the “pulled” side. I was inwardly bracing for another scream, but none came!
It was as I suspected– the outside hamstring was AWOL, and as soon as we got it to engage, the other hamstrings could relax. Happily go about their regular hamstring days.
Was the hamstring really “pulled”?
I think not. I think it was under an incredible additional amount of workload because of the amnesia in the outside hamstring. As soon as we redistributed the workload, the “pull” sensation should be eradicated.
Here was the big test: How would she feel when she stood up?
“Fine,” she said.
I said, “Plain ‘ole fine? You’re fine? Six weeks of rest and all it took was a few hamstring curls and you’re FINE?” I think I was more excited than she was.
“Yep,” she said.
Teenagers! So blasé. 🙂
Hamstrung playing soccer
Recently my soccer teammate emailed me and said he had played our coed game, and then stayed to play another game to help out a team short of players. (Sound familiar? 🙂 He said, “I wished you were there as I pulled my hamstring badly. I could have used your expertise. I can’t walk. Do you have any ideas for me? Spectators on the sideline said that in the moment the hamstring pulled, it looked as though I’d been shot I went down so quickly!”
He was positive he would be out for weeks. I wasn’t convinced. There was no bruise, first of all, and second of all when he runs his legs never fully straighten out. Never.
What did I do to get him back playing soccer two weeks later? Check out this video I made as a FitnessFriday tip for eatnakednow.com and let me know how it works for you in the comments below.
It’s time to go play a game the whole family can enjoy. If Foot Golf didn’t pique your interest, then maybe a more upper body- focused sport might? In my family, I find it’s tough to find a game that allows for different levels of playing abilities. It is difficult for a good tennis player to play against a bad tennis player, for instance. The ball goes flying into the next court, the good player practices their overhead smash one too many times, and both are left frustrated. Well, here’s an alternative that might just be your next new favorite game.
Pickleball!
What? What is pickleball?

from pickleball.com:
“Pickle-ball® is a game for the whole family. So it’s only fitting that it was invented by a family, too. The game got its start back in 1965, in Bainbridge Island, just a short ferry ride away from Seattle, WA
When Congressmen Joel Pritchard, William Bell and Barney McCallum came home from a game of golf one day to find their kids bored and restless, they set out to create a game that would engage them through the lazy days of summer.
They wanted to create a game that would be challenging, but still accessible. They handed the kids table tennis paddles and a wiffle ball, and lowered the net on their badminton court. In the coming days both kids and adults alike fell in love with the game, and as they played the rules evolved (to include the non-volley zone, for instance) and solidified to their present incarnation.”
When I was in college as a part of my PE degree requirements I was required to take two team sports, five individual sports, and one dance. I chose pickleball as one of my sports. It is relatively easy to play, relatively easy to teach someone to play, and really fun.
If you are a snowbird, then you already know about this fantastic game. Apparently there are leagues all over the Southwest….the Boomers know what I’m talking about!
I set out with two teens in tow to check out the pickleball scene here in Portland as it had been two decades since I played in college. (Wait! Not true. My friend Janell built a pickleball court next to her house, and I played ever-so-briefly with her kids on a visit once. Super fun. 🙂 I have always refered to it as life-sized ping pong.
I researched and found drop-in pickleball play. We got there early enough to help with set up. Here is what the net looks like:

You play with a wiffle ball and a big ping pong paddle. The ball having holes in it inherently slows the speed and trajectory of the path of the ball for new-to-the-sport players. Two people are on either side of the net, and I happened to be paired with a seasoned veteran who was all of 11 years old. I announced I was a beginner, as I thought that was the safest and easiest way to establish that his partner was no gem. I know he was trying to be helpful with coaching tips like, “You know, if you hadn’t gone for that ball it would have been out!”; and as I smashed a ball right into the net, “I used to do that all the time when I was your level.” (in this case Karma is a *itch: he smashed his very next ball right in the net as if he were ‘at my level’ again! bummer!)
Ha! 🙂 I then begged out for a “rest” break. My next partner was, quite by coincidence, the NW Regional Pickleball Ambassador. What a nice man. Fantastic player, and super encouraging in the best way. He even gave me a coupon for a discount on my own pickleball racquet. I will say, there was a mix of people out there playing. The majority were grey haired people out on the court, but youngsters and young adults had a presence as well, with a pretty even split for boys and girls.
Here are some photos of the action taking place. We were indoors at a former tennis facility that put in wood floors.
There was a challenge court, and the players there were tearing it up with volleys smashing back and forth in close proximity to each other. This was one of the shirts one of them was wearing:

There are a couple rules to follow if you are going to play. Some are remarkably similar to tennis, but a few are different. For instance: Be sure to let the return of serve bounce. Both people on one side of the net serve before the serve is turned over to the other side. Scoring is announced prior to the serve (volley only) by your score-their score- and what server number you are (either one or two). Finally, you can’t go into the “kitchen” which is the area right by the net. Be sure to bump racquet ends over the top of the net at the conclusion of the game!

If you would like to read up on pickleball, give this short novel a look. It was recommended to me by the Ambassador.

Have you played? I think it was great fun, and I broke a sweat! Let me know in the comments below!
Here is a beautiful little velella velella washed up on the beach. Notice the arches all through its little body.

Here is the Chihuly seashell ceiling, from the Chihuly Bridge in Tacoma, taken while lying on the ground looking up at the sky. Look at all of the arches and arcs all through the glass.

Here is an actual reflex arc diagram. See the arc created with red and blue lines? This is what we are going to take advantage of to help you actively rest…otherwise known as not stop moving while recovering from an injury.

Image courtesy of adapaproject.org
In the classic definition of a reflex arc, most scholarly articles talk about the patellar tendon test, where the doctor taps your knee with a rubber hammer and your lower leg and foot shoot out in a kick. However, I was with a physical therapist who told me that not only does a reflex arc come in handy in situations where you need to respond before your brain has a chance to kick in, but in an injury situation. He told me that 30% of the neurological information transfers from the left side to the right side when doing a movement, or vice versa.
30% of the neurological information transfers? Fantastic!
I have used that one tiny tidbit of information to great advantage. I had always noticed from sheer observation that the second set of any exercise always seem to go better than the first try. I am not a big fan of assigning what I consider to be arbitrary numbers to any given exercise. Nonetheless, it is useful so that people will stop working one side, work the opposite side, and come back to the first side to give the muscle and the movement prime neurological feedback.

How does this help an injury?
Well, you don’t necessarily have to work on the injured side, but consider working the uninjured side to help your brain remember what it is like to move well. How it feels to move pain-free. What muscles are involved in the movement. If you are feeling somewhat healed, try it out on the injured side.I promise your body will tell you immediately if it is ready or not.
Do you feel the same muscles moving in the same way on the injured vs. uninjured side? Is there any pain? Can you figure what the discrepancies are from right to left or left to right? This puzzling out and paying attention will reap great benefits, even if it just feedback to give to your acupuncturist, physical therapist, chiropractor, etc.
Most people operate on the premise that all of their muscles are working all the time. I find that is almost never true.
Be a detective! Puzzle out what might be suffering from a little muscle amnesia, and talk to me about what has worked for you in the comments below!
Follow me


Copyright 2022
JustMuscles.net