How do you get your outside hamstring to engage
Does the inside-towards-the-back of your knee ever hurt, or get sore, or have sharp pain causing you to limp or feel like you are going to collapse on that side? Read on!
First of all, let’s get to know the anatomy of the area. Watch this quick 1 minute video using what I fondly refer to as “Mr. Muscle Guy” as our illustration.
If you aren’t in the mood to watch the video, this is what I say:
Okay, it’s Laura; let’s look at Mr. Muscle Guy here, and take a look at the anatomy of the inside of the knee really quickly. I am going to blow up Mr. Muscle Guy here, and spin him, and you can see that there are three muscles that dovetail on the inside of the thigh. I am going to touch one of them: there’s the one that crosses the front of the leg. The next one on the inside if you look at that little dovetail there, and touch the inside, it runs straight up on the inside.
The one really is the kicker here is the one that is furthest back in this little trifecta of dovetailness and it’s that guy- oh look! It’s a hamstring! Okay, so that’s the anatomy of the inside of the knee. )
Why is knowing the anatomy important?
Well, all of those muscles dovetail on the inside of the thigh. If all of the muscles are super maxed out, they are likely starting to pull on the places they attach. This is one potential reason why the inside-towards-the-back of the knee is starting to hurt. The knee is just feeling the tension of the maxed out muscles.
Specifically, keep an eye on furthest back third musketeer- the inside hamstring muscle whose official name is semitendinosus. It is that tendon that pops out, making the inside of the knee feel like a guitar string.
Here is a still photo of our friend the hard working inside hamstring :

How do we balance things out and fix the overworked inside hamstring?
First, I would really roll or scrub those quads with your roller or rolling pin since they are the direct antagonist of all of the hamstrings. Notice when you roll your quads, your legs naturally want to roll in, and when you roll towards the outside of the quads (fronts of thighs) you sometimes find a ridiculous amount of tightness.
That outside quad directly interferes with the outside hamstring. Only one can be tight, and if the outside quad is “winning”, then the outside hamstring is quietly waiting his/her turn.
That is ANOTHER reason the inside hamstring is tight– the outside hammy has been knocked out of commission!
You’ve got to get the outside hamstring muscle to kick in. Watch this video of my client Jennifer to see how you can accomplish this easily and without fancy equipment…
Let me know in the comments below when you try this exercise out. Additionally, do you like learning about the anatomy? (I think it is super interesting 🙂
Here’s to balance, strength, and happiness!
Why should I warm up before I exercise?
Does warming up really do any good? I think it all depends on what exactly you decide to do for your warmup.
I decided to subject my client Corinne to a slow motion video analysis. It was a beautiful day, and she was having knee trouble, and frustrated with running longer distances. I asked her what she did for a warmup, and she said “a little bit of stretching”.
Oh boy.
(Sidebar: Remember, static stretching DECREASES the number of NMU’s you have available. Neuromuscular units. When you first start to exercise, you want to INCREASE your NMUs.
Please don’t static stretch until AFTER you are done! )
To see where she started, we decided to do a before and after video, and even videos after each exercise to see what impact that exercise made.
Here is what she looked like having just jumped out of her car without any warmup whatsoever.
We were pressed for time, and I wanted to create a moving warmup that she could do literally on the fly. I have three favorite hip muscles that I spend 80% of my day working on with everyone, so believe it or not, we targeted those right away.
Exercise #1 – Walk sideways:
(An old favorite!) Moving to the left, drive through the right heel as you feel the right glute engage. Make sure both glutes are working equally… if you feel a discrepancy, then spend time on the glute that needs to work more.

Exercise #2 – Pump up your hip flexor
In this case she is walking backwards, and lifting one foot in line with the hip (actually err to the midline of the body) up to about ninety degrees. Feel that hip flexor in the front of the crease of the hip, relax your foot, and make sure both sides are working equally.

Exercise #3 – Walking Hamstring Curls
Walk and bring your heel to your hip. Anchor the movement with your glute, so contract your glute as you lift your heel and feel the back of legs working equally. There are three hamstrings, and hopefully you will feel all three working across the entire back of the leg.

Now watch what happens when she runs after working on these three simple exercises:
She looks like a totally different runner! She’s got bounce rather than a shuffle, her legs are extending much further back, her upper body isn’t so stiff and leaning forward as much, and she said it felt easier and looser. All good stuff, and not really all that time-consuming or rocket science to execute! 🙂
What then is the logical conclusion?
YEA~! Warm up!
Do it dynamically, and target big powerful hip muscles that directly impact your movement. Try the ones listed above, or let me know your favorites and how that works for you in the comments below!
How to make stairs your friend and a mini workout
For those of you who have video challenges, or slow wifi, or just like to read:
Going up
In this video I am on the way up a staircase. Sometimes this is the most dreaded activity some of my clients face in day, and I want to give you some food for thought on how to think of staircases as your friends rather than some horrible thing that you have to get through. So, when you are coming up the stairs, what you are trying to do is pick your leg up with your favorite leg-picker-upper muscle.
To find that muscle you are going to bring that knee up to ninety degrees and then err to the midline of your body just a little bit, because if you are out here looking for your hip flexor, you’ll be looking all day. Don’t be a cowgirl or a cowboy! You are going to pick that leg up, find that hip flexor, its right here in the front of the crease of the hip, real deep in that hip, and you are going to put your heel down and you’re going to drive thru that heel and you are going to use my favorite glute and hamstring muscle.
Then you are going to do the same thing on the other leg. Find that hip flexor muscle and put your foot down, drive thru that heel and use that glute and hamstring.
Hip flexor, glute, and hamstring;
Hip flexor, glute, and hamstring.
Stairs do not have to be a dreaded thing!
Coming down
Now what happens when you have to go back down the stairs? Well, you’ve spent all this time finding your hip flexors – so let’s use them on the way down, too. You’re going to pick your leg up, find that hip flexor, and land in that hip. Don’t land in the knee, don’t land in the ankle, and watch the direction of the knee. If it is collapsing in, that can also be problematic and make knees super sore.
Find your hip flexor, and land in the hip. Find your hip flexor, land in the hip. Find your hip flexor, land in the hip.
Don’t forget coming back up: Lots of good hip muscles can be engaged! Hip flexor, glute, and hamstring. Hip flexor, drive thru that heel, glute, and hamstring.
Wishing you happy staircase running-up-and-downing.
Friendly Tip: Don’t buy a house with just one level. Staircases can be your friend and a really great way to kick in some good hip muscles.
Ok, this was my quick fitness tip for today, and here’s to balance, strength, and happiness.
Let me know in the comments below if you have befriended your staircase!
I am ALWAYS looking for ways to maximize any exercise that I personally choose to do, or subject my clients to doing. My ears perked up when I heard a Canadian presenter recently announce that the active workshop topic was about exactly that: maximizing.
He promised that if for instance we could do a two or three minute plank comfortably, he would have us begging to stop after ten seconds. (He was right!) Additionally, his premise was that all exercises start with a good plank, and you go from there. We will cover the good plank details in a future blog, but there were two other tips that he offered up about two classic standing moves I had not thought of.
Maybe you’ve tried them, maybe you haven’t!
In experimenting on my sweet clients this week, almost all were able to adopt and apply the very simple instructions pretty quickly, and feel the results just as quickly. In fact, today one of my clients said that she could not sit comfortably as a result of these tricks we tried on her just once two days prior. She said, “I imagine you consider this an advantage for two reasons: I can’t sit -which you don’t want me to to do anyway-, and that the muscles you were targeting you hit in a big way!”
Right on! 🙂
If you have difficulty, consider that most likely your outside quads are probably tight and could use some rolling before you attempt the “tricks” again.
Enjoy the quick two minute video! Let me know how these simple techniques work for you in the comments below. Add a little intention and get big results!
Does it hurt to walk?
Can you barely put weight on your leg?
Watch my short video, I have a potentially easy solution to your problem!
How to get your hands and grip strong
Do you ever suffer from hand fatigue after a long day at the office on your computer? Wrists ever sore or achy? This blog might be for you!
The other day my husband got home from his third day in a row of tennis matches, and noted his hands were really feeling the brunt of the games. He asked me how to get his hands stronger.
First, before we tried any of the hand positions below, I gave him a quick forearm massage which mirrored what I had witnessed in the hand therapy office. Remember that blog on fingers? https://justmuscles.net/injury-treatment/six-tips-fix-finger-wont-bend/
I knew that three days of gripping might have maxed out his forearm muscles, and since every muscle only has so many contractile fibers, he might be at capacity. When your muscle is maxed it feels like you don’t have any strength left, and the uneasy feeling of weakness starts to creep ….into your psyche. Next, you feel old. Further, you wonder why three days of tennis (fill in your sport here) could be so taxing. Finally, you despair that you might not be able to keep this up.
Don’t let it!
Fortuitously, I had just taken the most interesting yoga class, and the teacher decided to focus on hands! The following are some of the positions she had us try. My suggestion is to try them first on your hands and knees, and then to pump up the volume, pop up into a plank or downward dog.
I came out of class, despite the fact that I had been furiously taking notes and shooting photos of my fingers so I wouldn’t forget any of these cool hand moves, with hands that were curiously (and amazingly!) refreshed and invigorated.
1. Steeple Hands
Before you go down on your hands and knees, try just bending your fingers in the “steeple” move below. My pinkies just won’t cooperate as I think there might be some double-jointed weirdness going on, and in this case my coworker couldn’t get his thumbs to cooperate, either.

2. Pinkie Fist
Everybody is great at making a fist starting with your thumb, but this time I want you to start with your pinkie. (Curling my pinkie first is such a challenge!) Once you have your fist, go onto your knuckles and put some pressure on your hands with your shoulders loaded on top. Then sit back and unfurl your fingers slowly, one at a time, ending with your pinkie. Your brain is getting some great work here, too!

3. The Claw
On your hands and knees, press down what my instructor decided to call the “ring finger mound” – so the bottoms of the fingers/top outer edge of the palm. Press that so the palm is lifted and just the base of the fingers and the fingertips create the “claw”. Try something on your hands and knees here, or again, pop up into plank! Notice that most of the time you divert force away from your fingers and use the bottom half of the palm of the hand.
I had never paid much attention before, and now it took lots of concentration to keep the fingers in their “claw-like” formation.

4. Thumb Fist
First we tried a fist with the pinkie leading the way, and now we have the thumb leading the way. Again, once you have your fist made, put some pressure on it in a hands and knees (or fist and feet) position. Careful of rings, ladies!

5. Open Steeple Hands
Get ready to go onto your fingertips by pressing fingertips actively together in the air, and then actively on the ground.

6. Fingertip pushups
Just kidding, but do try going on just your fingertips to see how it feels on your hands and knees.
Wiggle around a little and go from there.

7. Back of Hand Jive
Notice we have spent time on the palms, on the knuckles, the fists, and fingertips, but nothing on the back of the hand yet. Try a Pinkie Curl, and then place the back of your hand on the floor, and load up.
Wow.
Was that ever tight on me! My poor coworker couldn’t get his arm to a ninety degree angle for this photo. That was his best effort, sweating bullets. Can you bend your wrist to 90 degrees? If you are having difficulty, this move is for you. Try pointing your fingers in different directions.

Let me know if these hand motions and positions were helpful, and what your results were in the comments box below. Have fun!
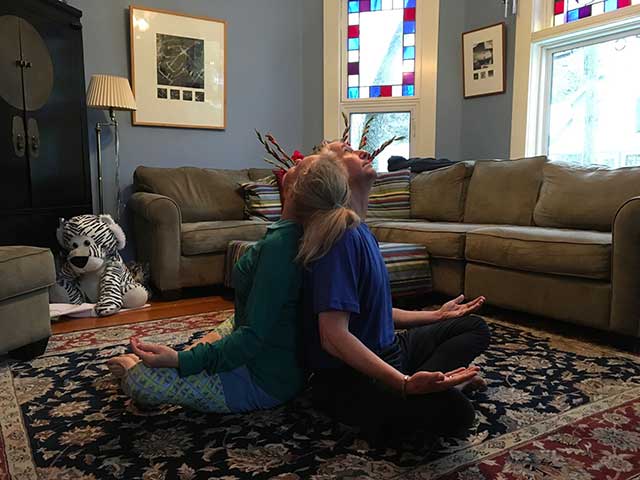
How to stretch with a buddy – part two
As promised, here come the “fancy”, more involved buddy stretches. Again, it is remarkable to me how much deeper you can get into the stretch with someone guiding you, even slightly. Additionally, recall that while cooling down it is best to hold these stretches if possible for the magic release and reset amount of ninety seconds.
Have fun!
6. Back Stretch
Hang onto your partner’s ankles and have him/her walk backwards slowly to create the maximum stretch down your spine. In yoga this position is called “child’s pose” in case you didn’t know. 🙂 Breathe!

To add more excitement to the stretch above, have your partner place their hands on the back of the tops of your hips and apply gentle pressure. Be sure to communicate and let him/her know if you’ve got too much going on and to back off, or to dig in and apply more pressure! They should also feel a stretch down the backs of their legs, too.
Breathe!

7. Downward Dog Hamstring Helper
Pop up into yoga’s famous Downward Dog (also popular with real dogs 🙂 with your hands and feet on the floor. Ian’s Downward Dog is ridiculously good, so it was a surprise to me that I was adding any help. If your heels need to be up, fine. Mine do, and I want to get out of the calves and into the hamstrings and shoulder blade area. Have your buddy try one of two ways to add some depth to this stretch- by pressing gently into the mid-back as shown below. Breathe!

Try also gently pulling back on the hips as shown here. Again, communication is tantamount to having this be a pleasant addition to your normal stretch… if you pull too hard then your buddy’s muscles will rebel! 🙂 Breathe!

8. Half Moon Hip Opener
Ian is a yogini and can easily put his hand on the ground. I prefer a block or a low ottoman under my hand (rather than the ground) to lift me up a bit. I’ve got my left hip turned and supporting the back of his hip, and I’ve grabbed his hip bone and shoulder simultaneously and gently pulled both towards me. This feels fantastic! Breathe!

9. Inversion Hammy Stretch
If you thought the Downward Dog helper was fun, then let’s pump up the volume. Walls and doors usually work better than furniture, but our Chinese chest is super heavy and solid so it won’t go anywhere. Ian is gently pressing on my hips to increase the stretch in my hammys. Breathe!

I return the favor and help his mid-back and shoulders open up more. Breathe!

If your partner really wants to invert and use their feet to press rather than their hands, here you go! Breathe!

10. The dreaded Boat Abs Pose
– but more fun with your buddy and your puppy!
My back is rounded a bit, so do all in your power to make a perfect “v” as you sit on your sit bones in your hips. We were messing around trying to equal out the balance of power in between our feet. Your abs might be screaming after a minute and a half….Breathe!

11. Inside Hurdler Stretch
Instead of turning the knee in and foot out, try turning the knee OUT and the foot IN. Now lock forearms, and one partner puuuuullllls the other forward. You’ll feel your back, and your hips, and even your arms lengthen gently. Aaaaah. Breathe!

Finished? Awesomeness!
Give your buddy a footie “high 5”! Some people also call this Scorpion Down Dog, but I had never attempted the footie high 5 at the same time.
Way more fun! Open up that hip! Breathe!

Let me know in the comments below which you liked and which were challenging, but no matter what, have fun! Breathe!
How to stretch with a partner in 5 easy moves
It is January, and all the world seems to think it is time to get moving. One way to get moving is to enlist the help of a friend or buddy to workout with, which can add greatly to the fun (and accountability!). Recently, I tripped over a partner yoga workshop, and it was super interesting to see how much farther and deeper I could stretch knowing I had a buddy to help me relax more deeply into the move.
Stretching often gets skimped on or overlooked, and don’t get stuck on the fact that this came from a yoga workshop. Just breathe deeply and grant yourself the ability to relax for once!
Here are 5 basic floor moves… you might be surprised to discover how very simple moves gives you lots of bang for your stretching buck. Try holding each move for the magic release and reset time of ninety seconds.
Stay tuned as we will get into the “fancier” moves next time!
1. Deep belly breathing.
I often remind my clients that their rib cages are three dimensional and thus they must breathe into the front belly, the side belly, and the back belly. The back seems to be the trickiest to expand for most, but when you are sitting back to back with someone their back gives you something to breathe against. Thus, you have some kinesthetic feedback. I thought just that part was really cool; plus then you can feel them breathe too.
You don’t have to have your palms up. Try just quietly resting them in your lap. Palms up allows your shoulders to roll back slightly, which opens the whole shoulder girdle area.

2. Neck Stretch
Turn your head to the side, and then rest the back of your head on your partner’s opposite shoulder. Wow! That really opens up the front of the neck in a new fun way. Be sure to do both sides.
3. Chest Stretch
Reach your arms straight out to the side and put your palms together. Have one buddy pull the other’s arms back gently to stretch the chest muscles. Be sure to tell your partner how you are doing so that you can increase the stretch by pulling forward more, or releasing the pull. Breathe!


4. Shoulder and Chest Stretch
Now raise both arms up in the air, and again have one partner pull the other’s arms back. Play with the angles with your arms….maybe straight up isn’t comfortable, but you can get away with a 45 degree angle. Great! Do that!

5. Side Stretch
Keeping one arm in the air, pull back and over one shoulder adding in the sides of the rib cage to the stretch. Again, allow your partner to take you a bit further and deeper into the stretch to get more out of it! They will move you places you might not move on your own- that makes it fun!


I understand that none of these are rocket science. The new and fun part was to try them with someone, and if that someone is your sweetie (Valentine’s Day is coming faster than you know!) then all the better. That gives you a teensy bit more couple time, but these are very versatile and work great at the gym with your running buddy!
Let me know in the comments below how using a partner went for you. Hope you like it!
Coming soon: footie high fives!
How to fix that pesky quad pull
AND the 15 second test to see if your hip flexors are working properly.
I was just reading a blog post by Boston fitness guru Mike Boyle. He has been reading about the work of physical therapist Shirley Sahrmann. This caught my eye: “The wisdom that Sahrmann shares in her book “Diagnosis and Treatment of Movement Impairment Syndromes” explains many of the injury riddles of the strength and conditioning field, particularly the “hip flexor” or “quad” pull.”
He goes on to say that he, like many others, never differentiated between the five different hip flexors that the body can use to lift the leg off the ground. Three of them (quad, sartorius, and TFL) attach to the front edge of the hip or iliac crest. The other two hang onto the spine (aka psoas) and inside of the hip bone (aka iliacus).
The psoas and the iliacus are pictured below. Since they have the same function, they are often grouped as one muscle called the iliopsoas. To get to these muscles, we would have to scoop out all of your intestines. We won’t do that today. 🙂

Further, “In the case of a weak or under-active psoas or iliacus the femur may move above the level of the hip but it is not from the action of the psoas and iliacus but rather from the momentum created by the other three hip flexors. With this knowledge in hand, I believe that our knowledge of back pain, “hip flexor strains”, and ‘quad pulls” is drastically expanded.”
What????
Simple English: IF your psoas and iliacus aren’t working, you’ll compensate with other muscles in the back and quad, leading to “quad pull syndrome” or “back pain” among other things.
Great. I am actually fairly familiar with this, but what can you do about it?
A simple test
Well, you should figure out if your REAL-in-the-hip (psoas and iliacus) hip flexors are working. Try a simple test!
Boyle says, “Sahrmann’s test is simple. In single leg stance, pull one knee to the chest and release. Inability to keep the knee above ninety degrees for 10-15 seconds indicates a weak psoas or a weak iliacus.
Other signs of weakness:
- a cramp at the iliac crest in the region of the TFL (front of outside of leg)
- an immediate backward lean to compensate
- a large pelvic shift to the right or left
- a quick drop from the top with a “catch” at the ninety degree point “
However, Mr. Boyle likes his version of the test even better:
“If …the subject is a skilled compensator, we have developed a better test that also has become our favorite psoas/iliacus exercise. The test was actually developed by strength and conditioning coach Karen Wood. Have the client or athlete stand with one foot on a plyo box ( 24″ works well for most) that places the knee above the hip. With the hands overhead or behind the head, attempt to lift the foot off the box and hold for 5 sec. Inability to lift and hold is indicative of a weak psoas and or iliacus.”
Try it!
What happened?
Here is the funny thing. I was not super awake when I read this blog for the first time, and I didn’t follow the very simple instructions very well at all when I decided to experiment with my client Elizabeth. She had back surgery about 18 months ago and her left hip is difficult at best to get working.
We started warming up with a simple squat which gave her…. BACK PAIN! Remember… see above… the “back pain” reference? A compensation jumped out at me and it was time to demonstrate to her that her hip flexors needed to be on board!
So, drawing from a foggy memory, I had her do the following:
Rest her foot on a platform, shift her weight to the glute on the straight leg, and simply try and pick her foot up off of the platform. Her hands are at her sides.
Here she is with the weight on the right glute, trying like mad to pick up the left foot. She has her lips pursed in her very concerted effort.

Any luck picking that left leg up, Elizabeth?
Nope. It didn’t budge.
She looked at me in astonishment.
“How then have I ever managed to walk up stairs?”
My answer: “Your quads!”
(Which, if you then ever pull your quad, but keep inadvertently using it to pick your leg up off the ground all day every day, you start to develop a “syndrome”– “quad pull syndrome”. That quad just never seems to heal, and re-injures so easily…)
Now we shifted sides, and I had her try the same thing with the right knee in the air. She manages a small smile this time as she clears a good couple inches with her right foot.

So now we know one iliopsoas is not working (left side) and one is working faintly (right side). What could we do to develop these muscles?
Crawl.
That’s how they develop in the first place- when you were a baby!
Here is Elizabeth crawling forward and backward, using the “Perfect Pushup” handles.

Here is Elizabeth crawling sideways.

Go, Elizabeth, Go!
Now, as a final test, I really did follow some of the test protocol and got her knee higher than the hip by resting it on the medicine ball.

“Now lift it!” I told her. She could barely move it, but this time it was patently obvious she was using her iliopsoas. She could feel it distinctly.
Therefore, by first identifying her lack of true-blue-muscles-in-the-hip-flexors, and then isolating and strengthening them, her squat was no longer painful. She was no longer compensating with her back for what her hip wouldn’t or couldn’t do.
Her back pain was gone!
Which fitness tracker works best?
I’ve tried out a few, and like the fun of competing with myself and others, achieving 10,000 + steps a day, and potentially even earning money. However, be prepared for the not-so-good news…the accuracy and durability of the trackers varies wildly.

Wildly.
I have personally used the FitBit Blaze, the MyZone heart rate belt, the UP band, the Apple Health app on my phone, and the Body Media device used by KrowdFit in the early days. They are pictured below.

The Body Media band broke twice (which is why it is not pictured), I lost the UP band (also why it is not pictured), I don’t like exercising with my phone, the FitBit Blaze won’t tell me what time it is while I am in “exercise” mode (which is super crazy-making if I am on a tight time schedule), and the MyZone belt only gives me exercise credit while I’m doing cardio, not weights.
All annoying features.
However, I found additional motivation while a member of KrowdFit because you can earn cash! There are a bunch of websites that will give you or your favorite charity rewards or discounts, and here are a few:
AchieveMint, Pact, Charity Miles, Higi, Walgreens Balance Rewards, Bounts, FitStudio, Leap4Life, EveryMove, and KrowdFit.
Check them out. It could be fun!
Now the super-not-so-good-news:
How accurate are these things?
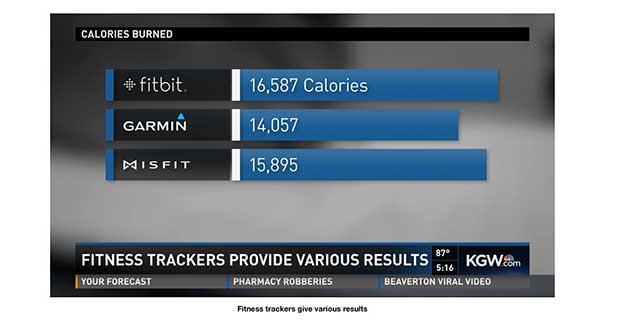
I happened to be watching our local channel eight in August, and this question was posed by one of their investigative reporters, Kyle Iboshi. He bought three of the most popular fitness trackers and wore all three for a week.
Here are the three that he bought:
![]()
He wore them night and day.

Here are the total calories he supposedly burned, according to each of the three trackers:
Notice there is a fluctuation of 2500 calories over the week between the Fitbit and the Garmin. If you consider that 3500 calories is a pound, then that is significant!
Additionally, here are the steps taken according to the devices:

Again, notice the Misfit and Fitbit have a chasm of over 18,000 steps. Hmmn.
How then do we know which is right? Well, Mr. Iboshi hoofed it over to OHSU’s Human Performance Lab and had them calculate the real deal using a metabolic gas-capturing mask on a treadmill.

Here are the results on distance:

NONE of them measured distance accurately. Look how far off the Garmin was! The Garmin wasn’t even the biggest steps taken in the first bar graph. Hmn.
How about calories?

IF you track calories, in this case the Garmin was the closest. Look how far away the MisFit was! Almost 100 calories! Hmn.
Remember that Mr. Iboshi is an investigative reporter, so he took it upon himself to contact the three companies and see what they had to say for themselves. You find out more about his research the KGW website
MisFit and Garmin did not respond, and Fitbit had this to say:

So what is a chocolate lover to do?
Clearly, since you are not buying a scientific or medical device, take it all with a grain of salt. Be content with general numbers, and if your device buzzes you because you’ve been stationary too long, then all the better!
Have fun with it, and if you buy one that tracks heart rate then you have some VERY tangible data to work with.
My Fitbit Blaze throws a little digital party when I hit 10,000 steps: it buzzes, sends bands of color across the face, and texts me a message. I think that is fun! I know I have gotten somewhere in that range, and I always try for more to make absolutely sure.


What’s your favorite device and why? Let us know in the comments below!
Image source: courtesy KGW.com
Follow me


Copyright 2022
JustMuscles.net