How do you make a kid workout fun? Here’s one idea: Take your kids’ favorite foods and turn them into a movement!
Once upon a time, I was asked to come help our favorite nutritionist Margaret Floyd Barry with her older daughter Sia’s posture.
I inwardly shuddered.
I don’t like using the word posture, as it brings up mental images of people with books on heads and strict headmistresses holding rulers whacking them on tables and things.
Ugh. No fun!
If I didn’t think it was going to be fun, then fat chance we were going to convince a cute 7 year old to think it was awesome, either.
What’s a trainer (Or a mom! Or a dad! Or an auntie!) to do? What she really needed was just to move, and that was becoming a bit of a battle. She’s little enough that the “posture” issue might just sort itself out if we could get some multi-directional movement in place.
Now, how to make that fun. (True for adults, too! Not gonna lie! 🙂
Making conversation because I was thinking on my feet, I said, “Sia, what is your favorite food these days?”
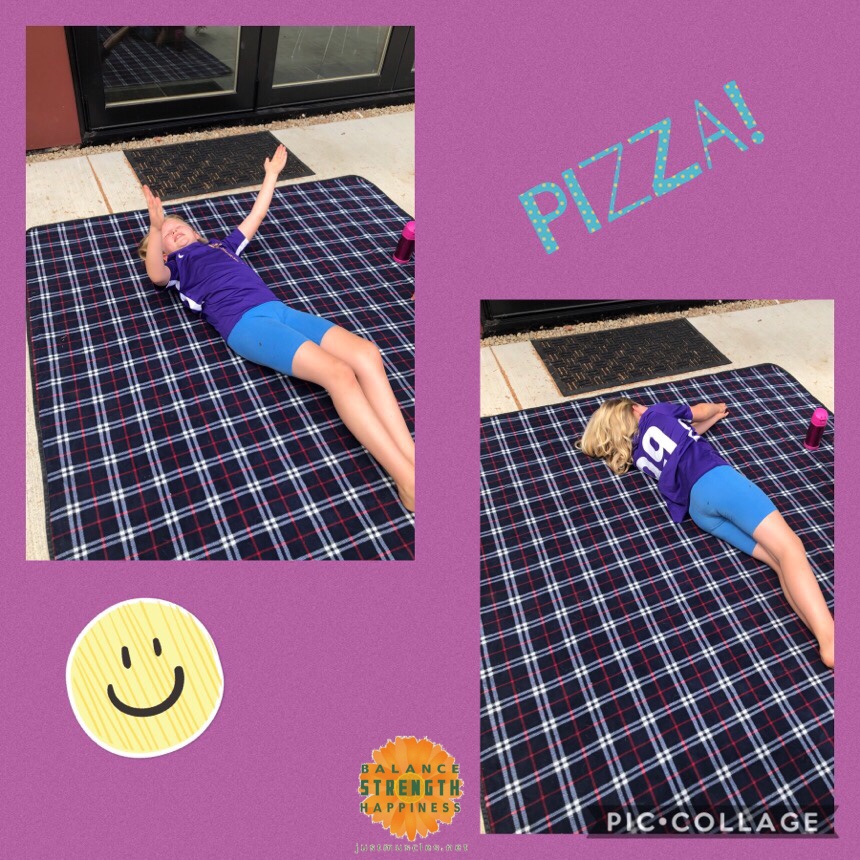
“Sushi!” She said happily.
“What does a sushi look like, Sia? Can you show me?” I said, a glimmer of an idea rapidly forming in my head.

Thus the photo above! She quickly made herself into the shape of sushi (which for you yoga fans out there might recognize as child’s pose) and thus the workout began. We added in a little “wag your tail” to the sushi, and I asked if she had any Spanish speaking friends that she would like to talk to.
“Yes I do,” she said.
“Perfect,” I said, “then I’d like you to be a sushi and way your tail while counting to ten in Spanish so you can practice talking to your Spanish-speaking friends.”
“Okay!” She said as she proceeded to sushi wag her tail saying, “Uno, dos, tres…”
Talk about multi-cultural! Fantastic!
Margaret gave me a look I couldn’t quite decipher. She told me later she wasn’t quite sure where I was going with this. Quite honestly, I wasn’t sure either. I sure hoped this would work! We had tried an animal name- based workout on the stairs once before with limited success.
“Next favorite food?” I asked.
“Pizza!” She exclaimed. I laughed. Even though she is the daughter of a nutritionist and a professional chef, she’s still a kid.
“Pizza it is then!” I said. “What shape is pizza? Can you show me?”
And so it went….
“Any other favorites?” I asked.
Without hesitation she said, “Chips!”
I laughed again. “What shape are chips, Sia?” This is what she showed me, after we discussed various ways to make a triangle.

“Any other favorites? What do you have for breakfast, for instance?” I asked.
“I love toast with avocado and egg and salt!” she said.
This gave us lots of shapes to work with. I quickly discarded avocado as it would give us more “sushi” shapes and she didn’t need more of that.
Here’s what we came up with for toast, egg, and salt:

We needed to “Crack the egg”, so we came up with “exploding egg” 🙂

I said, “Salt needs to be turned upside down on it’s head and shaken, so that’s what you’re going to have to do too!”

“Any lunchtime favorites?” I asked Sia, wondering what she would come up with next.
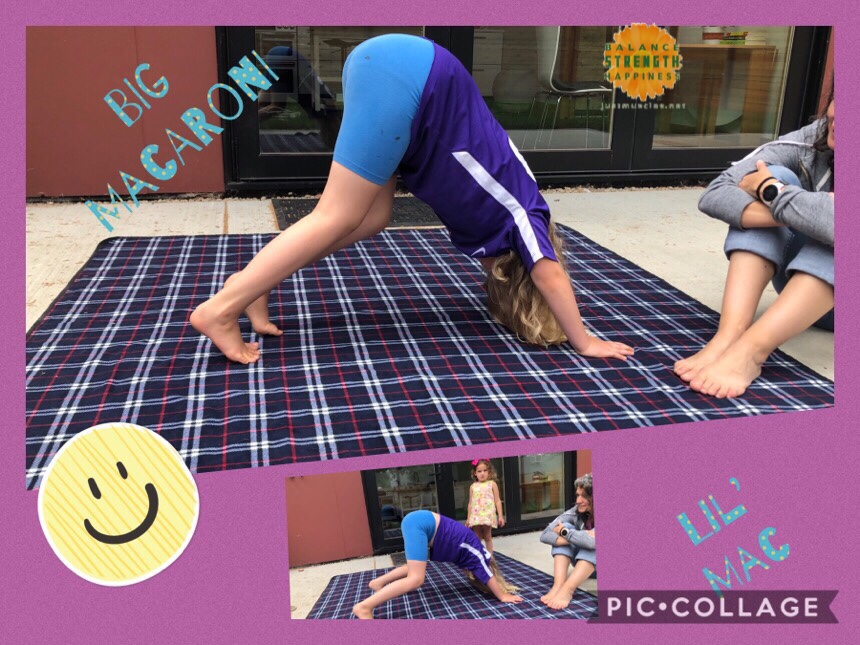
“Homemade Mac and Cheese!” Sia said.
I thought to myself….Aah, a chip off the ‘ole block, except that Margaret’s favorite is actually Kraft Mac and cheese. (This is her big normalizing factor. She really likes that orange stuff!)
Feeling like a game show host at this point, I said, “Show me the Mac and cheese!”
The key is to not make it too long with easy to remember names, and most of all, kid-driven. I didn’t come up with any of this other than to guide the movement and make sure we hit lots of directions.

I knew we were onto something when she came up with the kid version of yoga’s Cobra without any adult intervention or suggestion. Wasn’t the food theme but who cares! She’s moving!
Additionally, she had finally cajoled her little sister Sasha into coming over, and the two of them became sleeping snakes, and here they are demonstrating snakes waking up! Hiissssssssssssssss 🙂
Moral of the story: Time to quit when you are ahead!
I smiled, gave elbow high fives, and sent the photos to Margaret later.
The next day she texted me and said they had all done the food workout with great success, and then added in baby bears crawling to Papa Bear for hugs before breakfast.
Awesome!
Let me know in the comments below what you’ve done to cajole your kiddos into moving when they won’t or clearly need to!
(By the way it is Sia’s birthday tomorrow and she is the star of her own YouTube series “Yuck your Yum” so check her out!)

If I’m not free, you’re not free.
In the spirit of Juneteenth, I have made a video for the freedom of a certain part of your body that quietly gets tight without you knowing. This will also help with endless Zoom calls! What am I talking about?
Your thoracic (or just “t”) spine!
That is the center of the back, just below the neck and above the low back. If you are sitting for long periods of time in front of your computer, your body can slowly start collapsing down into the letter “C”.
Why does that matter?
Well, then the muscles in the center of the back get really tight, and then they clamp down on the vertebrae, and then the vertebrae can compress the nerves.
In this case, the nerves that come out of the middle of the back go to the organs, rather than muscles. This can sometimes cause upset stomach, or weird heartbeats, or strange breathing….which would make you think that these organs have been affected by some strange disease.
That is certainly possible, and should be checked out, but I always like to eliminate the possibility that the middle of your back might be a contributing (or major!) factor.
How do we do that? Simple!
When you are sitting, put something firm in the middle of your back to chip away at any tightness that might be developing or lurking in there. This could be a rolled up yoga mat, or your tennis balls in a sock, or my favorite: your small roller!
Watch the video below to see how easy it is, and then you can lean back and relax while you Zoom or FaceTime away!
Let me know in the comments below how this works for you!
P.S. Celebrate freedom, and more importantly make sure freedom is available to all!

From Portland Art Museum’s website about the art above: Throughout his career, Hank Willis Thomas (American, born 1976) has addressed the visual systems that perpetuate inequality and bias in bold, skillfully crafted works. Through photographs, sculpture, video, and collaborative public art projects, he invites us to consider the role of popular culture in instituting discrimination and how art can raise critical awareness in the ongoing struggle for social justice and civil rights.
In addition, PAM supported the creation of a new and monumental flag-based work addressing lives lost to gun violence in the United States in 2018 that served as the entry point to the “All Things Being Equal” January 2020 exhibition.
Today is the Anniversary of the D-Day Invasion. On this day 156,000 troops stormed five beaches in Normandy, France, from the USA, Great Britain, and Canada. It is the largest amphibious assault in world history, and a day ago four-star Marine Corps general Jim Mattis wrote about it. He said, “Instructions given by the military departments to our troops before the Normandy invasion reminded soldiers that “The Nazi slogan for destroying us…was ‘Divide and Conquer’. Our American answer is ‘In Union there is Strength.’” We must summon that unity to surmount this crisis- confident that we are better than our politics.”
Thank you, General Mattis, for your brilliant and powerful words reminding us to summon our unity. Thank you, Hank Willis Thomas and Portland Art Museum, for your beautiful artwork.
We will look back on this time in history in amazement and wonder at some point in the future, but in the meantime, we need to take care of ourselves in order to have the energy to take care of others and our community.
Let’s start with the current reality of wearing a mask. This week I had the chance to wear my mask for four and a half hours three days in a row. Nothing, I realize, compared to all the frontline essential workers who have this reality all day every day, but it was eye opening.
I had noticed previously in the grocery store that my shoulders were creeping up towards my ears, and occasionally felt like I couldn’t breathe well. How can two layers of fabric incite mild panic? I haven’t the foggiest notion, but it happened to me. The minute I was back in my car I would happily tear off my mask and breathe that precious fresh air.
However, now that I am partially back in the gym, it is a requirement to wear masks and gloves at all times. This forced me to think about how to breathe and not allow mild panic and shoulder/neck tension to reign.
It was then that I remembered good core breathing. What do I mean by that? Well, you breathe all through your nose (in and out!) and allow your shoulders to disengage, while expanding the deep diaphragmatic muscle under the bottom of your rib cage.
Picture an umbrella sitting up under your rib cage, and as you breathe in deeply (all the way around the rib cage, not just the front!) the ribs expand as the umbrella opens…and as the umbrella closes, the ribs deflate too.
Awesomely, breathing diaphragmatically engages three internal core muscles- the transversus, the pelvic floor, and the multifidus. You are engaging these muscles and thereby stabilizing your core simply by breathing all through your nose.
If you were to go for a 30 min walk break, try breathing just through your nose in and out for the first 10 minutes. Try running and breathing just through your nose for chunks of time. Try recovering from an interval all through your nose even though you are breathing hard! Your shoulders will love you, your core will love you, and all of your cells will love you for all the oxygen you are sending out!
Let me know in the comments below how it feels to just breathe through your nose. Great? Weird? Relaxing? Oxygenating?

Here is my late cousin John Harris using his powerful lungs to belt out a song at our wedding! He was a terrific singer, but what if you don’t even like to sing?
What can you do to help out your respiratory system?
Exactly what can you do to help get your lungs stronger and more prepared for a respiratory illness such as COVID-19?
Well, a doctor from Queen’s Hospital in London has a certain technique that he and the head of nurses noticed helped with patients.
The beauty about it is that it’s quite simple:
5 deep breaths in holding for a count of 5
On the 6th deep breath, cover your mouth and cough hard from the bottom of your lungs as your exhale.
Repeat two times!
Then, for the next 10 minutes, lie on your stomach on a pillow and take deeper than normal breaths.
The idea is to shake loose the mucus that can collect at the bottom of the lungs and make it available to cough up and out of your system.
If you lie on your back, you can restrict the littler airways and worsen your condition, and/or definitely put it in a less-than-optimal condition.
I made a quick video about it here, so watch it and let me know if you’ve tried ir or other techniques that you like better or that feel more oxygenating.
P.S. You may inhale and exhale however you’d like: either nose or mouth. (I got all excited making the video and use my shoulders and open my mouth as if more air could come in that way- forget that part! 🙂

Ever used a tennis ball to help a trigger point in the back of the hip? Specifically the booty?
Really what I am asking here is: do you have a pain in the booty?
Have you ever found yourself digging your fingers into the center of the back of the hip? It feels like there is a screwdriver lodged in there, and you can pinpoint the spot…right in the center of the booty. That is your glute actually!
The screwdriver feeling is the attachment of the gluteus medius muscle. One of the the jobs of the gluteus medius muscle is to internally rotate the femur.
Anybody ever comment on your “knock knees”?
This exercise is for you! If your knees roll in when you walk, or your whole upper leg collapses inwards, you have really strong internal rotators. You need to balance that out with equally strong external rotators.
This is one way to do it!
All you need is a tennis ball, and you lie on your back with your knees bent, and jam that tennis ball into the back of the hip. You are looking for a tight spot, which usually isn’t too hard to find. Then you let your leg fall to the side, and while you do this, you try and consciously contract the glute max.
Tricky, but possible.
Watch the video below to see the exercise in action, and let me know in the comments below if it took the pressure off that screwdriver!

Whenever I see a fantastic set of stairs I don’t sigh, I celebrate! My mind starts imagining all the fun workout things you could do on them…
Do you have access to a few (or a bunch of) stairs, indoors or out? Instead of dreading the climb, watch the video below to see what you can do for a zinger of a workout in a very short amount of time.
I much prefer to be outdoors if at all possible when I workout, so I would rather be on this grand staircase, but any and all will do!
This workout is comprised of 10 moves. In order to be most efficient, you have an “up” exercise, and then when you get to the top of the staircase, a paired “down” exercise.
Here is the lineup, and you will do each pair three times. There is magic in 3’s! 🙂
1. Stair Crab/Bear Crawl
2. Karaoke/ Grapevine
3. Frog Hop/Squat Hop
4. Crab Walk/Backwards eyes closed
5. Walk backwards up/Forwards eyes closed
6. Bear crawl backwards
The video below will showcase the exercise, and then it is up to you to execute the exercise groups three times before you move on. Of course if you don’t feel comfortable doing one of them, feel free to make your own variation.
Let me know in the comments below how you liked the variety of things you can do with just a simple set of stairs…
Be safe, and healthy, and happy…and go find some stairs!
I have noticed lots of walkers out and about with their dogs and kids…and this leads me to believe that more walking here there and everywhere may be contributing to another global trend….
Namely, the feared (and I made this name up 🙂 Tight Quad-itis.
NOOOOOOOOO! Not that!! 🙂
What makes me think this might be a “thing”? You’ll never guess what happened. I was virtually working out with my friends last Friday, and when I had us all try and reach back to stretch our quad in a kneeling lunge position, TIGHT QUAD-ITIS struck and all 4 of them fell over in big hamstring cramps.
Simultaneously.
It was hysterical, and painful, and hysterical all at the same time. 🙂
So how do we avoid big hamstring cramps and how do we address this phenomenon that I have termed “tight quad-itis”? They are most intricately linked as they are partners in crime… also known as an antagonistic muscle pair. When one muscle is loose, the other muscle is supposed to be tight, and vice-versa.
Remember there are 4 quads on the front of the leg and 3 hamstrings on the back of the leg. Those four quads get used over and over and over as people walk straight ahead and forward most of the time. Tight hamstrings? Sure, lots of people have them. However, before you ever go after the hamstrings themselves, make sure their antagonist friends the quads are out of your way!
Here are some strategies to get those quads to behave, so you can tackle the hamstrings later!
Watch the video below and let me know in the comments below what your favorite quad or hamstring stretch is!

So you’re stuck at home. Gym is closed for the foreseeable future. You meant to get a something to workout with at home, but never got around to it. When you look at your options, you see a weight or two, and your roller, and that’s about it.
Fantastic! That’s all you need!
I like to use the roller with clients to get shoulders, neck, and upper back to open up from hours spent pouring over a computer keyboard….or a long commute…or curled up in a ball while you sleep….or numerous other forward-facing-pulling activities.
Most of my clients graduate from just using the roller to release tightness to using it to workout on, too. That packs a fabulous double-whammy: roll time that allows the upper back in particular to release, and strength training with a particular ability to focus on the underutilized role of the shoulder blades.
The roll has always given users the unique ability to tap into those shoulder blades and what they are -or aren’t- up to, and this is no exception. In fact, as you throw a weight around you will know very quickly if your shoulder and shoulder blade are working at full capacity under load.
Normally I like to give you a quick fitness tip to help you navigate a potential problem in your body. This time, for the first time, I made a full length “Workout along with Laura” video. I even had to edit it because I talked so much! 🙂 You are welcome to mute the audio, but please, take 15 mins (that’s all YouTube allows!) and try throwing some weights around on your roller.
I promise you will really like it! 🙂
P.S. If you find that your roller feels too hard, then by all means throw a towel on it to give it a little cushion. Individual tastes may vary!
P.P.S. Please let me know in the comments below what you think. More of this full-length stuff? I am super curious!
After a long week of commuting, typing away on your computer, endless clicks on your mouse, or even gaming some people find themselves with tight and sore wrists, fingers, and forearms.
Did you know it doesn’t have to be something you just live with? Did you know it doesn’t have to be something you always take ibuprofen for? Did you know there are some very smart people in the world who have resigned themselves to those two choices.
There doesn’t seem to be a way out….or is there?
First and always foremost please make sure you have good solid hips to work off of. In my world, that means two glutes, two hamstrings, and two hip flexors. Start there. Sometimes just leveling out your hips wil do wonders for your shoulders and you can stop right there!
Next, grab a rock and a little lotion. Take the lotion and put it on your forearm, and then dig the rock in stroking motions up the arm towards the heart. Lots of clients find tight spots they had no idea even existed.
Next, watch the video below and tap into some good wrist mobility in the muscles of the hand and forearms. You’ll be amazed at how much tension is lurking there!
Let me know in the comments below please how this works for you…do you like it? Need more? Too much? I’m super curious!
Have you ever found yourself wandering through the forest wishing you could enjoy the scenery, but you’ve got this pesky sore neck thing happening. Or, you could be at work in front of your computer, and the same thing is happening….
That happened to me just yesterday! I was out on a walk one one of my favorite forested trails, and my neck was bugging me. Ahead of me was a bridge over the creek that the park is named for- Tryon Creek.
I thought, what could I do right here right now to help settle this neck down?
I am a big believer in using whatever is in your environment at the time, so I noticed the rails on the bridge over the creek. I grabbed one, turned my head to the opposite side, and tilted my chin down towards my shoulder.
The railing allowed me to create more tension and stretch in the neck muscle, and there I stayed for a full ninety seconds. That got a nice stretch in the back of the neck, in the trapezius muscle area.
However, there still seemed to be some tension towards the front of my neck. I notice the front of my neck A LOT the next day when I crash and burn snowboarding, but it can be just at noticeable when you’ve had excessive screen time. Therefore, I continued my grab of the rail (and you can grab a doorknob or chair or under the counter or desk…) and this time tilted my ear towards my shoulder.
HOLD the stretch for 90 SECONDS!
Those neck muscles, wether the front (scalenes and sternocleiodmastiod) or back (trapezius) respond best when held. Hold the stretch. Don’t bounce it, don’t let anyone squeeze and release the area, and don’t bail before the 90 seconds. That is the magical neuro-muscular release and reset point, as well as allowing emotions to process through your body!
Lots of good stuff happens in 90 seconds …let me know how you like the stretch in the comments below!
Follow me


Copyright 2022
JustMuscles.net